| |
Character Rigging In Maya
Blendshapes
Facial Animation is
probably one of the most important parts in animation, good
facial animation will blend right in with your characters
performance, and will hopefully give you the ability to emote
all of your characters feelings to the intended audience, be
it sad, happy and so on. Using Maya's Blendshapes, we
can create all of the different facial poses we would need to
believably bring our character to life.
Before we carry on
and get into the nitty-gritty or Maya's Blendshapes, I'd like
to to introduce this small section, when I work with Maya's
Blendshapes, I personally prefer to use a Horizontal Layout,
over Vertical Layout, however when I quit Maya and return to
it later, the default setup of Vertical is back again, now
this is entirely up to you and how you work, but for those
that work like me, you can set Maya up so that it is always
Horizontal Layout as the default instead : -
Go to your Maya's Other
Scripts directory, for example, C:\Program
Files\AliasWavefront\Maya4.5\scripts\others, then find the
file called createBlendShapePanelMenul.mel, edit it
using whatever editor you would normally use, Notepad will do,
find the following line : -
string $ma[] =
`menuBarLayout -q -menuArray $panelControl`;
straight after on the next
line, add this line : -
blendShapeMenuCmd $panel
bseMIHoriz;
That's it,
when you load Maya up now, Horizontal Layout will be the
default layout.
Phonemes and
Visemes
A Phoneme is the
smallest unit of language that can convey meaning to the
audience, for example the "p" in pot, or the "th" in
thud. Alternately, Visemes are the actual visual
counterparts of phonemes, one viseme can have many phonemes
associated with it, for example the "M" in mat and the "P" in
pat are two distinct phonemes, but visually they would look
the same, and so could be used under the same viseme (or mouth
shape). Whereas this isn't going to be a
modelling tutorial, I will however, showcase the models and
various facial shapes I have created along the way.
Let's look into the mouth shapes first, what I should also say
though, is if your character has teeth, make sure you don't
move the upper teeth when creating blendshapes, they are
attached to the characters skull and as such, aren't moveable
away from it during speech, only the bottom set of teeth would
move during speech because of the jaw joint, if your character
has a tongue, be careful to make note of where the tongue is
during some mouth shapes, TH, for example would
require the tongue to be between the upper and lower
teeth. Also note, Blendshape will not work with
groups, so even though we parented the eyes to the head, when
creating your head blend shapes, I'd recommend unparenting
them, you can parent them back when your done. Back on
track now, for most basic speech animation on a character, the
lowest amount of phonemes anybody would use would be 9, these
9 phonemes would usually be broken down as : -
1. A,
I
2. O
3. E
4.
U
5. C,
K, G, J, R, S, TH, Y, Z
6. D,
L, N, T
7. W,
Q
8. M,
B, P
9. F,
V
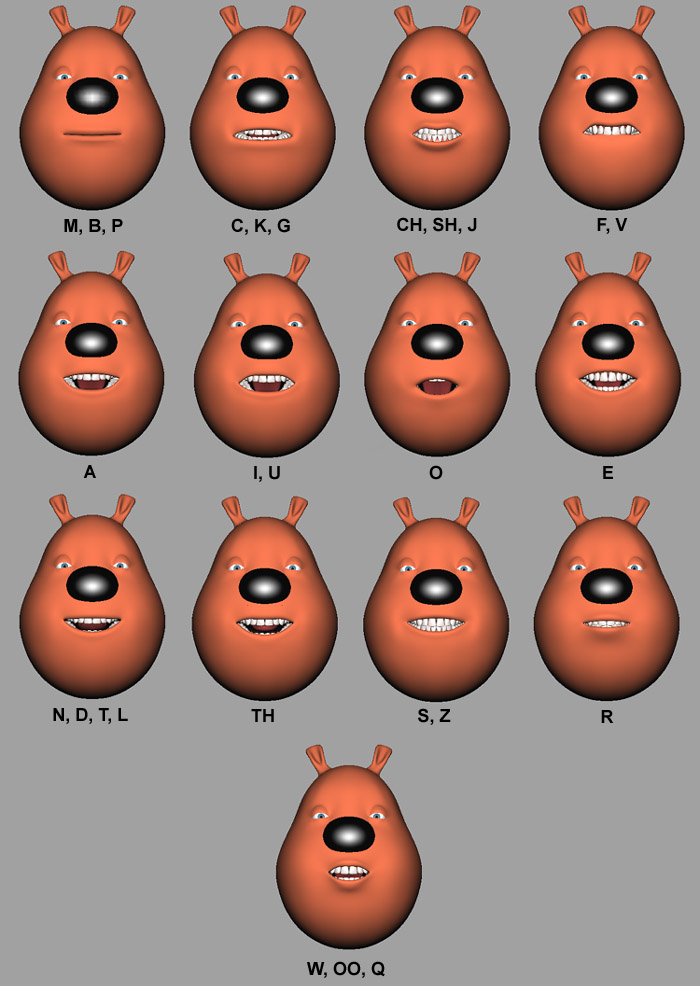
Personally, I prefer to have
a bit more control over my mouth shapes, so I use more head
shapes to define my phonemes, these are broken down as :
-
1. M, B,
P
2. C, K, G
3. CH, SH,
J
4. F, V
5. A
6.
I, U
7. O
8.
E
9. N, D, T, L
10.
TH
11. S, Z
12.
R
13. W, OO, Q
Visually, these phonemes
would look like : -
What I do when creating
blendshapes is I create a duplicate of the main head, and then
transform it to somewhere I can work on the actual modelling
process of generating the required shapes I need, I also name
the duplicated version to what they will represent in the
BlendShapes List, for example, my first duplicated head would
be called, M_B_P, the second head would be called C_K_G and so
on. I'd recommend the use of a mirror when creating these
shapes. Obviously, we can't animate all the expressions
of the face with just phonemes, we also need to take into
consideration emotion and expressions, typically, there is six
different base emotions, these are : -
1.
Sorrow
2. Anger
3.
Joy
4. Fear
5.
Disgust
6. Surprise
We can model a good variety
of the types of blendshapes that we would need to convey these
emotions, at the same time, some could be used for completely
different purposes, angry type eyes mixed with a sad looking
mouth could convey deep sorrow, typically when creating the
types of blendshapes that are used in emotional and also
everyday type situations, we create left and right sides by
themselves, so we can mix and match how we please, for
instance, one eyebrow raised and one angry giving a james bone
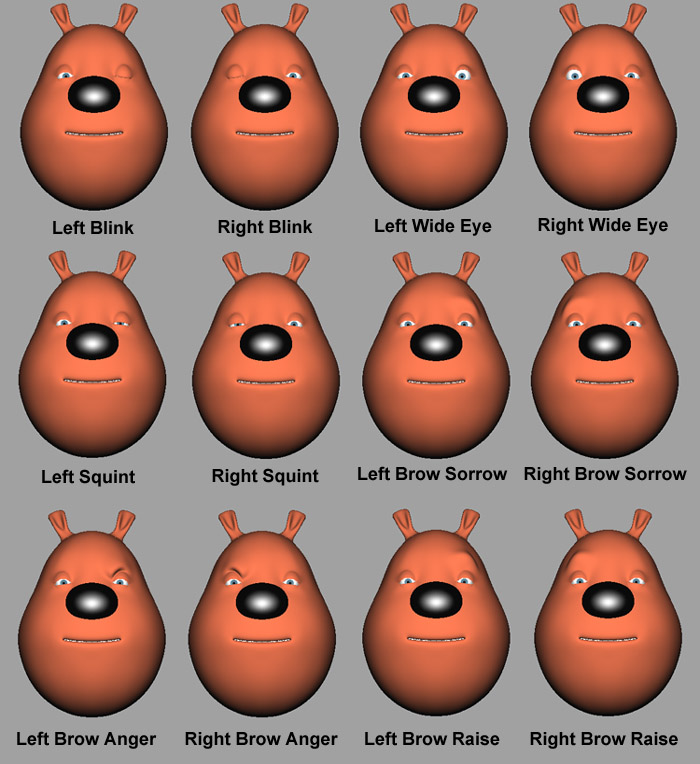
type feel to a character and so on. The next set of
blendshapes I would create would contain all of my eyelid and
eyebrow movements , these would contain the following
blendshapes : -
Eyelid
Movements
1. Left
Blink
2. Right Blink
3. Left
Wide Eye
4. Right Wide Eye
5.
Left Squint
6. Right
Squint
Eyebrow Movements
1. Left Eyebrow
Sorrow
2. Right Eyebrow Sorrow
3.
Left Eyebrow Anger
4. Right Eyebrow
Anger
5. Left Eyebrow Raise
6.
Right Eyebrow Raise
Visually, these would look
like : -
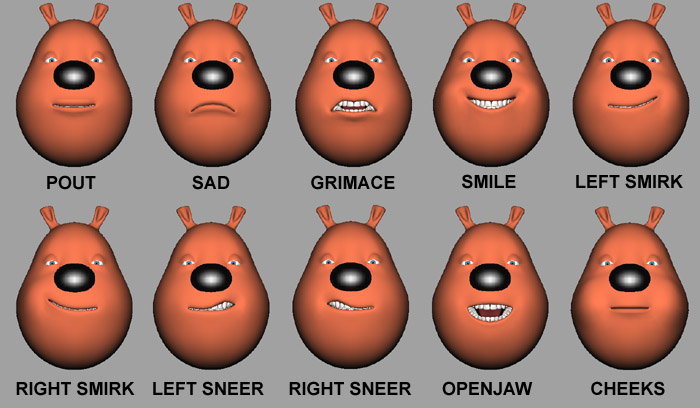
It wouldn't finish there
though, again, the emotional aspect comes into play within the
mouth area too, and the phonemes we have originally created
just aren't enough to create all the extra emotion we would
need from the mouth area, typically, for the mouth area, the
extra shapes that would be required would be : -
1.
Pout
2. Sad
3.
Grimace
4. Smile
5. Left
Smirk
6. Right Smirk
7. Left
Sneer
8. Right Sneer
9. Open
Jaw
10. Cheeks
Visually, these would look
like : -
With these
Blendshapes, I believe you have a very good base for which to
begin facial animation with, as with most things in life, they
are all subject to change within your own projects and
requirements, for instance you may create a character whose
only purpose is to wander around in the background of the
scene, you would only create a few facial expressions where
needed, but no phonemes as there would be no lipsync animation
taking place. Once I have all my blendshapes, I select
them all 1 by 1 in order of preference, now when I say order
of preference, I'm referring to the way I want them to appear
in the Blendshape Window, I need them to be in some sort of
order, so I wouldn't, say, for example, select the Left_Sneer
Blendshape and then select the O Blendshape, as that would be
the order they appeared in, instead, I would select them in
the order I created them, so the phonemes would be selected
first, in order starting from M_B_P, and then C_K_G, and so
on. Once you have them all selected, you then simply go
to Deform > Create Blendshape, and the blendshapes
are created. To bring your blendshapes up, just select
Window > Animation Editors > Blend Shape, and the
blendshape control panel will appear where you have a slider
based interface ready to use and animate. Also, to save
on disk space and file size, once I have created the
Blendshape list, I will delete all the heads and save to a new
file, as the blendshape list now has all the shapes recorded
in that, I have all the polygonal heads saved in an earlier
saved file which I can load up anytime I need to, to recreate
or modify any blendshapes that need it. So, that it's,
we've now covered blendshapes, now all that is left is binding
our rig to the actual character polygonal mesh. We just
need to group everything that is is left now, open the
Outliner, and select all of the following : -
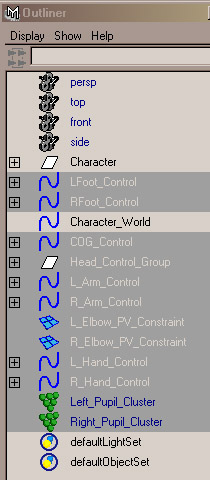
The select Edit >
Group, rename the new group to Character_Rig and then
parent it to the Character_World Controller. That's
it. As usual, you can
download the whole rig including all blendshapes here, which
I'd recommend doing before we move onto the next stage
:-
Final
Scene Before Binding With All Blendshapes - Maya 4.5 Only -
Zip File (469kb)
The Binding Phase :
-
Character
Rigging Tutorial - Eighth Page
|
|
