| |
Character Rigging In Maya
Binding /
Skinning
We need to connect
our model now to the skeleton, we can do this via two methods,
either rigid or smooth binding. Smooth skinning provides
smooth, articulated deformation effects by enabling several
joints to influence the same deformable object points.
Rigid skinning provides articulated deformation effects by
enabling joints to influence sets of deformable object
points. With our character, we'll be using Smooth
Binding, as this gives us the best influence over the
different areas of the character. Now, with the
character, I didn't create a neck, his head kind of sits in
his clothing area, I create 'that' area from a simple sphere,
and the head sits exactly in the pivot point of the sphere,
and when I create the skeleton joint setup, I snapped to exact
centre of this area too. The head, we will be handling a
bit differently to the rest of the character, open the
Outliner and select the character's Head, and then
select the character's Head joint. Press P to
Parent them together, that's our head now connect to the
skeleton. For the rest of the body we're now going to
use smooth binding. Open the outliner and select the
following, make sure not to select the groups, but the actual
objects instead : -

Once you have them
all selected, select the COG joint, not the
COG_Control, but the actual joint, then go to SKIN
> BIND SKIN > SMOOTH BIND. It should
calculate for a few seconds then finish. We've now
connected the character to the actual skeleton, but.... we're
far from finished, as you'll see. Select any of your
character's control and move them about, you'll notice the
character moves along with the skeleton, but the deformation
is quite off what we would like it to be, we now need to
'paint the weights'. At each joint where it is
bound to the character, it is given a weight of how much
influence it has over the particular area, during the smooth
binding process these are put in automatically, but they need
some cleaning up. Which is our next step.
To save us time,
we'll be painting our weights on one side, and then using
Maya's Mirror Skin Weights command to mirror them
across to the other side. Select the character's
BODY, then go to SKIN > EDIT SMOOTH SKIN > PAINT
SKIN WEIGHTS TOOL, and click on the options box to
open the tools window : -
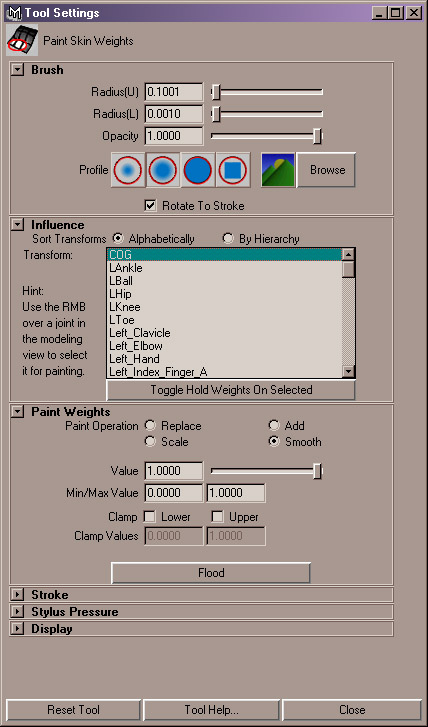
Within the Influence
area, you can select each joint as you need it, and then paint
the weights as you see fit for each section, we'll start with
the COG joint, in the Paint Weights section of the tool
box select ADD, then go to Flood, the
character's body which should have been in black and white so
you can see the weights, should now turn completely white,
we're giving full weight to the whole body via the COG
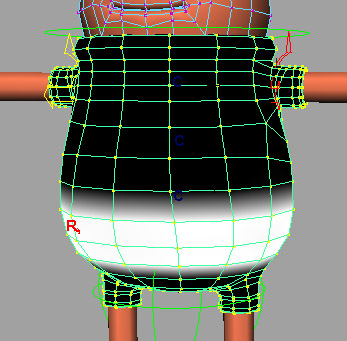
joint, then in the Influence section, select the SpineA joint,
and then paint the weights for that one, you should end up
with something similar to this diagram, I also suggest you
turn on Vertex Display within the Display > Polygon
Components section, as it will aid you when painting weights
across the vertices : -
Remember to paint
right around the character, once you've done this, select
Smooth in the Paint Weight section, and then press
Flood twice : -
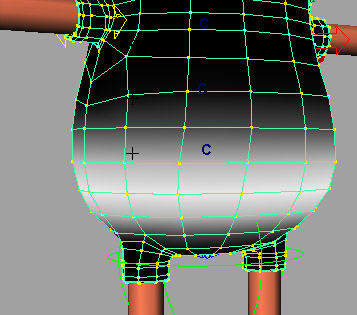
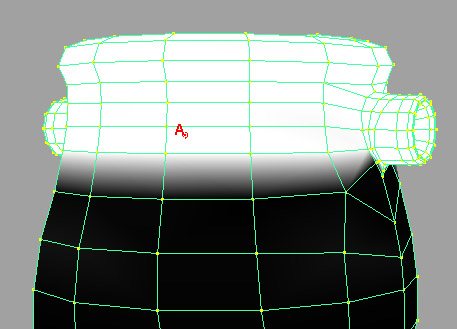
Now select
the SpineB joint, and do the same again : -
And again,
select Smooth in the Paint Weight section, and
then press Flood twice, select the SpineC
joint,
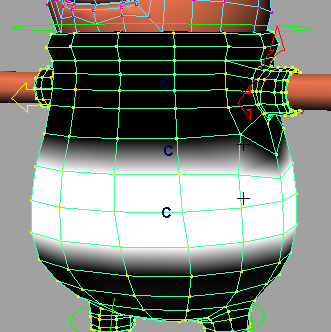
With the
SpineC joint, notice I've painted up towards the arms as well,
again, select Smooth
in the Paint Weight section, and then press Flood
twice. Select the Neck joint, and then paint weights for
that too. A handy tip that I learnt to use quite often
when I paint weights also, is to use Isolate Select when
painting weights for certain body parts, that way I can
concentrate only on the areas That I need to, such as the
inside of the neck area :-.
theYou
can mirror smooth skin weights, either from one smooth skin
object to another, or within the same smooth skin object. You
can also mirror skin weights on selected components of the
skin. select
Smooth in the Paint Weight section, and then press
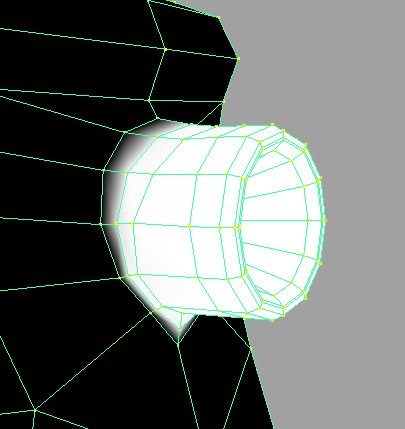
Flood twice. Select the Head joint, nice and easy
with this one, we don't want any influence, so in the Paint
Weights section, select Replace, change the Value to 0 and
then select Flood, remember to change the value back to
1 when painting more weights. Now we need to paint the
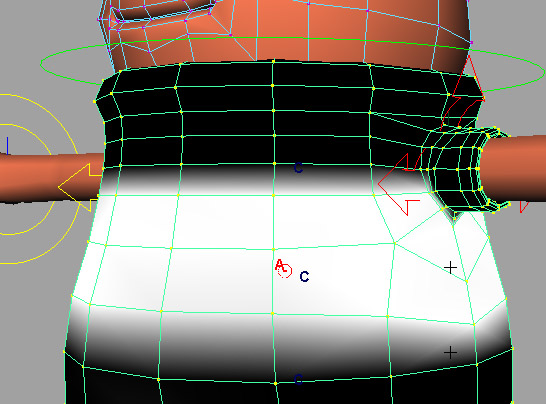
shoulder areas, select the Left_Shoulder and paint the
weights : -
Select Smooth in the Paint Weight section, and
then press Flood three times. Now to use the
Mirror Weights command, with the body still selected, select
SKIN > EDIT SMOOTH SKIN > MIRROR SKIN WEIGHTS,
that should take care of our Right Shoulder's weights.
Do the same for the LHip joint. I'd also
recommend using the Toggle Hold Weights On Selected
when your happy with your painting to keep the painted
weights corrected. Now, painting weights is a huge and
at times, tedious process, and as such I can't go into a
really fully detailed breakdown of the whole process within
the constraints of this tutorial, I will however, add a few
more hints and tips. Sometimes, there will still be
parts of your model being influence by other 'non-related'
parts, for instance, you paint the weights for the arm and
fingers and all the rest and then grab your controller and
move it around, for some strange reason parts of your
character body seem to be moving along with the arm, to
correct this, select the characters body, go into the paint
weights mode, and then select the arm, say the Left arm, start
from the Left_Elbow joint, select Replace with a value of 0,
and then flood, and then work your way down the characters arm
through each of the finger joints too and do the same each
time, this should fix the extra influences on the main
body. Another tip is to toggle between wireframe and
shaded whenever possible, as this can let you see some
vertices being influenced where you wouldn't normally
see. Another tip is to paint your weights on selected
areas with the affected joint in it's extreme pose, i.e.
the fingers would be best painted in their curled position,
one by one, paint the influence, and then hold the weight and
set the finger back to it's normal position.
As I previously
mentioned, the painiting process can be very intricate
depending on each models needs, and I really can't go into the
sort of depth needed within the scope of this tutorial, but
all I can say is you will get better and better with
practice. You can download the final model here with the
weights already painted, although they aren't perfect, but
maybe you can work on your weights here, I should also mention
that once you've animated your character, the final thing you
need to do is smooth the polygon object once or twice
depending on your requirements and render the high-res version
of the characer, using the low-res one to animate with :
-
Final Scene - Maya 4.5 Only - Zip File
(653kb)
Conclusion : -
In conclusion, there's still a lot I have to learn
personally myself in terms of character rigging,
this tutorial was part of my own learning process,
it was aimed at beginners, and hopefully, there's
been some benefit there. Looking back over
it, I'd probably do a few things differently, especially
the knee area, I wouldn't have it so far forward,
which means when I'm animating I have to compensate
for that, moving on, I would insert the knee join
a lot closer to the middle of the actual leg.
Anyway, thanks for reading along and I hope
you found this tutorial useful.
Back To Tuts
|
|
