| |
Character Rigging In Maya
Rigging The
Eyes
Before we continue on
the rig the eyes, there's a couple of small things we need to
do first. Open the outliner, and expand the
Character group, you can make the the Character_L Layer
non-templated now too if you wish for better visualisation,
now select the Nose and Head objects, then from
the menu select Polygons > Combine, you will end up
with one object called polySurface1, with
polySurface1 still selected, select the
Inner_Mouth_Group Group, and then again, go to
Polygons > Combine, then go to Edit > Delete
By Type > History, to remove all of the empty
nodes. Rename polySurface1 to Head, and
then add it to the Character group, to do this, within
the outliner, middle mouse drag it over the top of the
Character group to make it a child of the parent.
Now add it back to the Character_L Layer. Now,
select both the Eye_Left and Eye_Right groups,
and then middle mouse drag them both over the Head
object to parent them to it. Finally, with the Head
selected, press W to make sure your in Move
mode, then press INSERT to go into PIVOT mode,
then point snap the pivot of the head to the Head
joint, template the Charater_L Layer to make things a
bit easier when snapping to the joint. Ok, we're now
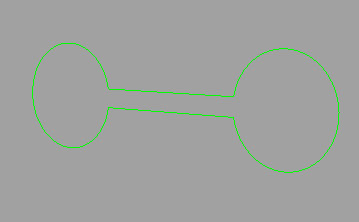
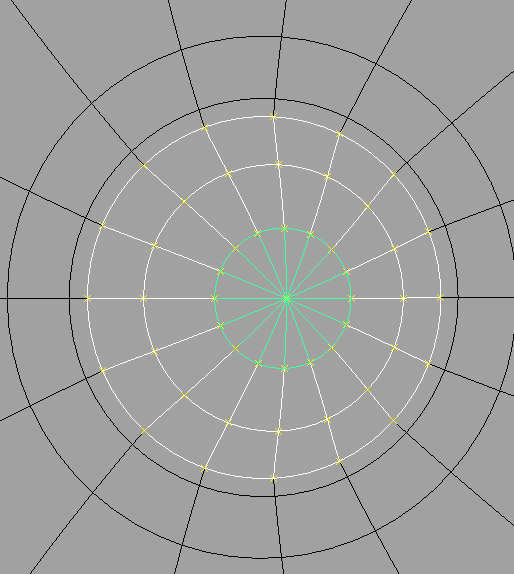
ready to rig the eyes, download the following file and import
it into your scene, then colour it green if it isn't already
and add it to the Rig_Controls Layer, it should be
named Main_Eye_Controls : -
Eye Control Object - Maya 4.5 Only
- Zip File (59kb)
If they're not
already, you can untemplate the Curve_Guides Layer, as
we'll be using the last two nurbs curve guides when we rig the
eyes. We don't need
our Nurbs_Guide curves anymore, as I've used the guides to
create the control object above already, right mouse click
over Curve_Guides Layer, and then select Select
Objects, the press DELETE, and then right-click
over it again and choose delete. Expand the Head_Control_Group with
Outliner, and then parent the Main_Eye_Controls to the
Head_Control. Let's set up this controller now,
so it actually does something when selected, select the
Main_Eye_Controls, lock and make non-keyable the Rotate
Z, Translate X, Y, Z, the Scale X, Y, Z and the
visibility. Select the Main_Eye_Controls again,
and then open the Connection Editor, Reload Left, then
within the Outliner, find the head object, and expand it, and
then select the Eye_Left group, and then Reload
Right. Connect the rotation values of both :
-
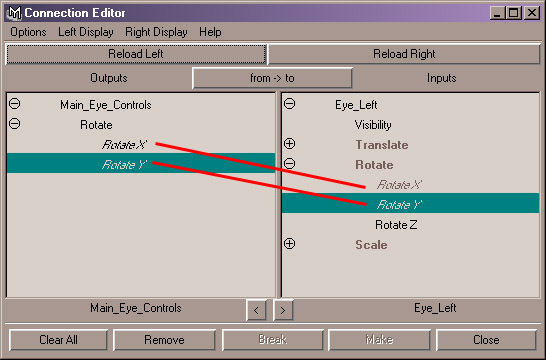
Do the same for the
Eye_Right group too, then Close the Window. Select the
Main_Eye_Controls, then select Modify > Centre
Pivot, just so our pivot point is in the correct
location. Let's add an attribute now for the pupil
dilation, select the Main_Eye_Controls, and add a new
attribute called Pupil_Dilation, min = 0.5
and max = 1.4 : -
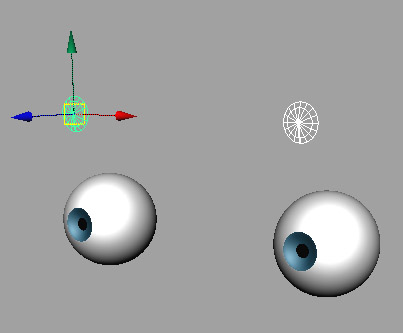
Open the outliner,
expand the Character group, find the Head and
then expand that, select both the Eye_Left and
Eye_Right group. In the Persp view, press F to Fit
them fully into view then select Show > Isolate Select
> View Selected so that we only have the eyes
viewable, select the corneas on the front of both eyes, go to
Modify > Centre Pivot, and move them up out of the way for
now, so that we can concentrate on the main parts :
-
Select the Left Eye
and then press F to Fit it, select the pupil and iris and
select Modify > Centre Pivot, then select Display >
Nurbs Components > Edit Points, press Insert for both and
snap both pivots to the central CV of the Iris : -
Select all of the eye, press
1 for lowest display, then rotate your view so that you are
inside the eye looking through it, you can switch off Edit
Points now :-
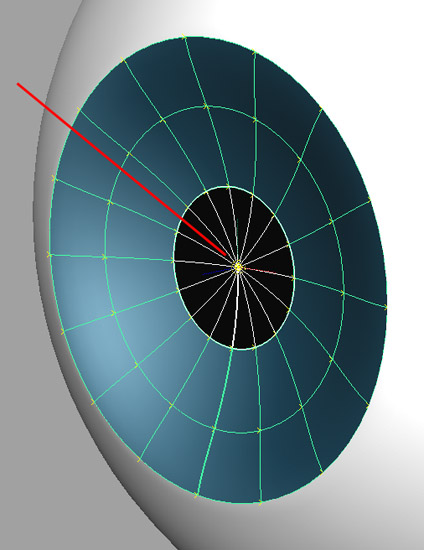
Select the
L_Eye_Iris, and then select the following CV's :
-
With them still
selected, right click over the the L_Eye_Pupil,
and select the Middle CV, then go to Edit Nurbs > Selection
> Grow CV Selection, Press G to repeat it again, and again,
and one more time to make sure, this is to make sure we grab
all the overlapping CV's where the Pupil and Iris meet, once
you've done this, deselect the CV's that are outside of the
original selection you made, you should now have something
like this : -
Go to Deform >
Create Cluster, don't worry about the Cluster not
displaying as we're still in Isolate Selected mode, now repeat
this process for the other eye. Once you've done the
right eye, select both the cornea objets that you originally
moved up out of the way and move them back, I moved mine up 1
on the Translate Y, so setting this value back to 0 will put
them back into the original position. select Show
> Isolate Select > View Selected so that we
have all of our objects displaying again, then open the
outliner, find the two clusters and rename them as
Left_Pupil_Cluster and
Right_Pupil_Cluster. You can add them both to the
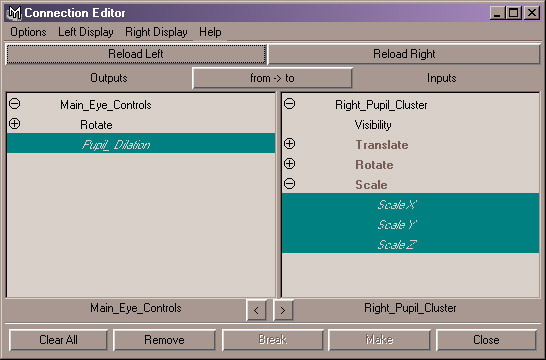
Rig_Controls Layer. Go to the Connection Editor,
Reload Left for the Main_Eye_Controls and for Reload
Right, load the Left_Pupil_Cluster, and then connect
the Pupil_Dilation to the Scale X, Y and Z, then Reload Right
for the Left_Pupil_Cluster, and again connect the Scale
X, Y and Z to the Pupil_Dilation : -
Select the
Left_Pupil_Cluster, and press CTRL + A to bring up it's
attributes, within the Cluster attributes section, turn on
Relative, do the same for the
Right_Pupil_Cluster. Select the Left And
Right Pupil_Clusters and press CTRL + H to Hide
them. Close the window, that's it, that's the eyes now
rigged. The Head isn't quite finished yet, but it is
finished in terms of rigging, the extras that we will use for
the head will be the actual Blendshapes for facial animation,
we'll look at that shortly.
You can download the
scene completed up to this point here : -
Rigging Scene - With Eyes Done - Maya
4.5 Only - Zip File (348kb)
Just about ready to start
our actual binding, but first, let's look at Blendshapes :
-
Character
Rigging Tutorial - Seventh Page
|
|
