| |
Character Rigging In Maya
The Head
Control
Create a Nurbs
Circle, and then Scale it to 4.5 in the X, Y and Z
channels. Snap it to the Head joint, then rename
it to Head_Control, the freeze transformations and
delete all history. Change the wireframe colour to
Green. We'll only really be using the Rotate X, Y and Z
for the Head, so lock the other channels, and then use the
Channel Control to hide them. The main reasoning behind
using a Head_Control over standard joint rotation
animation is this method can be used to eliminate the need to
animate the counter movements of the head when moving the
body. Thereby making it much faster to animate since it's
something we don't need to worry about. We're going to get a little complicated
here, so make sure you follow the instructions as carefully as
possible, open the Outliner, and find your Head joint,
press CTRL + D to duplicate it, rename duplicated
version to Head_Joint_Constraint, select the
Head_Joint_Constraint and the Head_Joint, and
then go to Constrain > Orient, select the
Head_Joint_Constraint, and then the Head_Control,
then press P to parent it and you can hide it if you wish,
but not the Head_Control. Select the
Head_Control, then press CTRL + G to group it, press W
to make sure your in MOVE mode, and then press the INSERT key
to go into PIVOT mode, using Point Snapping, snap to the
Head joint, press Insert again to come out of pivot
mode, now rename the group to Head_Control_Group.
Nearly there, select the Head_Control_Group, and
duplicate it, then delete all the contents, so that you are
only left with an empty group, rename this to
Head_Control_Group_Constraint, now with
Head_Control_Group_Constraint still selected, also
select Head_Control_Group and then go to
Constrain > Point, now parent
Head_Control_Group_Constraint to the Neck
Joint. Now, select your COG_Control and
rotate it around, you'll notice that the Head joint
always stays up over when moving left, right, forward and
back. And if you select the Head_Control, you'll
notice that you also have seperate control of the head
movements. Select the Head_Control and add it to
the Rig_Controls Layer.
Download the rig with
the spine and head setup here : -
Character Rig Skeleton Setup With
Spine Done - Maya 4.5 Only - Zip File (326kb)
Arms And
Shoulders
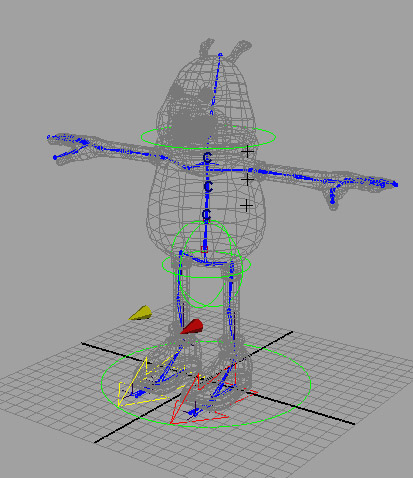
We're now going to
move onto the rigging for the character's arms and
shoulders. Let's start with the shoulders, but first,
download the following Nurbs Control Shapes that we will use :
-
Clavicle Nurbs Controllers - Maya
4.5 Only - Zip File (60kb)
Unpack them, import
them into the Maya scene, and even though I have them placed,
just to make sure, snap them to your Shoulder joints, and if
they're not coloured, colour them accordingly : -
Select them both and
add them to your Rig_Controls Layer. Select the
L_Clavicle_Control, then lock the channels for
everything but Translate Y and Translate Z, and then use the
Channel Control to make the locked one's non-keyable. Do
the same for the R_Clavicle_Control too. Before
we add full control of the shoulders / clavicle to the control
objects, we'll set up our arms beforehand, lastly add them to
the Rig_Controls Layer. With the arms, I'm going
to be using an IK Rig, a lot of people use a rig on the arms
that can switch between FK and IK, in this case, I want to
keep things fairly simple, so I'm just going to be using the
IK setup. Just like the knees we're going to use some
elbow constraints, so download these objects first, import
them into Maya, colour them as before, left and right colours,
and add them to the Rig_Controls Layer, (note I've also
colour coded the wireframe for the polygonal constraints too)
: -
Elbow Constraint Objects - Maya 4.5
Only - Zip File (60kb)
From the menu, select
Skeleton > IK Handle Tool, then select the
Left_Shoulder joint and then the Left_Wrist
joint, do the same on the other side, selecting
Right_Shoulder and Right_Wrist joints.
Open the Outliner, select the ikHandle1 and rename it
ikHandle_LWrist, and do the same for the
ikHandle2 naming it ikHandle_RWrist, select them
both and add them to the Skeleton_L Layer. Then
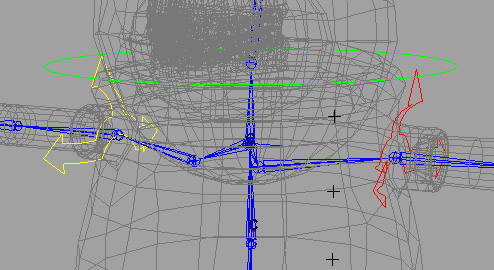
select the L_Elbow_PV_Constraint and then the
ikHandle_LWrist and then go to Constrain > Pole
Vector, and then do the same on the other side for
R_Elbow_PV_Constraint and ikHandle_RWrist.
You'll notice that when you do this, the hands may offset
themselves slightly out of sync with where they should be, so
using any method you want, either by rotating the hand joint
or using nurbs guide curves again, move them or snap them back
into where you'd like them. If you need to do this,
don't forget to re-orient the joints using the script we used
earlier too, I'd recommend starting from the clavicle joints
on each side. If your having problems doing this, you
can download a scene here with this stage set up for you :
-
Fixed Hand Scene - Maya 4.5 Only -
Zip File (331kb)
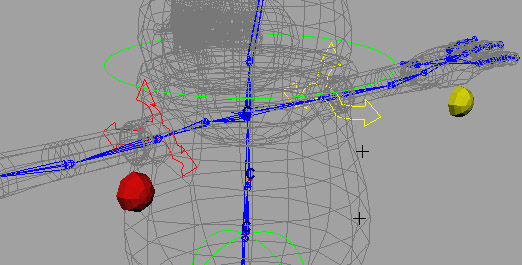
Select both the
ikHandle_LWrist and ikHandle_RWrist, Create a
nurbs circle, rotate it 90 on the Z Axis, and Scale it 2 in X,
Y and Z, rename it to L_Arm_Control, colour it
accordingly for the left side and then snap it to the
Left_Wrist joint. Duplicate it, and then do the same for
the other side, this time, rename it R_Arm_Control and snap to the Right_Wrist joint, colour
accordingly. Freeze Transformations and delete all
History, and add them to Rig_Controls Layer.
Select the ikHandle_LWrist and then the
L_Arm_Control and then P to Parent them, do the
same on the right side for ikHandle_RWrist and the
R_Arm_Control. Select the L_Arm_Control, and
Lock the Scale, Rotate And Visbility Channels, and then make
them non-keyable using the Channel Control. Do the same
for the R_Arm_Control. Select the
L_Arm_Control and create a new Attribute called
Elbow_Twist, do the same for the R_Arm_Control,
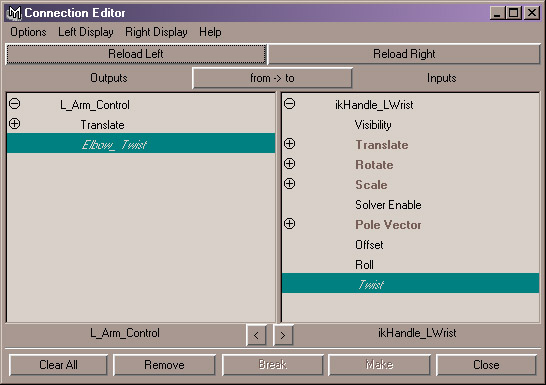
call it Elbow_Twist as well. Now in the
connection editor, load L_Arm_Control in the left
column, and in the right, load the ikHandle_LWrist, then connect the
Elbow_Twist attribute to the Twist of the
ikHandle_LWrist, again, do
the same for the right side too.
Because we've added an
Attribute to control the Twist, we won't be needing the elbow
constraints displayed any more, so select them both, and press
CTRL + H to Hide them or alternately, it's up to you,
lock all channels, and make them non-keyable, which is what
I've done.
Let's return back to the
shoulders, create a Locator, rename it
LClavicle_Locator and snap it to the
Left_Shoulder joint, add it to the Rig_Controls
Layer, select the LClavicle_Locator and then the
Left_Shoulder joint and then go to Constrain >
Point. Now, parent the locator to the
L_Clavicle_Control, create another locator, name it
RClavicle_Locator and repeat the same process
again. Then parent both L and R
Clavicle_Control's to the COG_Control, just so they
follow when rotating.
The Hands now, create a
Nurbs Circle, rotate it 90 on the Z Axis, and Scale it
1.3 in X, Y and Z, rename it to L_Hand_Control, colour
it accordingly for the left side and then snap it to the
Left_Wrist joint. Duplicate it, rename it
R_Hand_Control and snap it to the Right_Wrist
joint, colour accordingly, freeze transforms on both, delete
all history, add them both to the Rig_Controls
Layer. Select the L_Arm_Control and
Point Constrain it to the L_Hand_Control, do the
same for the R_Arm_Control and the
R_Hand_Control. Select the
L_Hand_Control and lock the channels for the
Translate X, Y, Z Scale X, Y, Z and Visibility
and then make them non-keyable, do the same for the
R_Hand_Control. Open the Connection Editor,
Reload Left for the L_Hand_Control, Reload Right for
the Left_Wrist Joint, connect the rotations : -
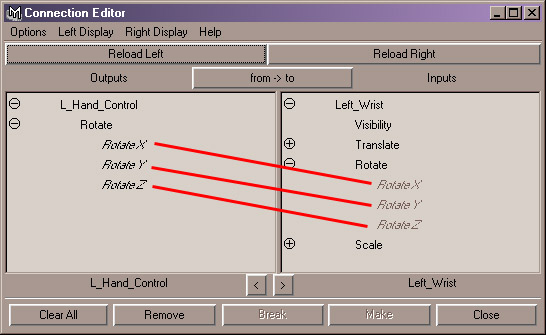
Do the same for the
R_Hand_Control and Right_Wrist joint. Now
let's move onto the finger and thumb rigging. We'll
start by doing the Left Hand and then move onto the
Right Hand.
The Fingers
We're now going to add some
extra attributes to the Left and Right Hand_Control objects
that will allow us to animate our fingers and thumb for the
character. Select the L_Hand_Control, and add the
following new attributes : -
Add these attributes first,
but with no minimum and maximum values : -
Attribute
Name
Minimum
Maximum
Inner_Spread
-25
10
Inner_Curl_Base
-70
5
Iner_Curl_Middle
-90
10
Inner_Curl_Top
-70
10
Index_Curl_Base
-70
5
Index_Curl_Middle
-90
10
Index_Curl_Top
-70
10
Pinky_Spread
-10
25
Pinky_Curl_Base
-70
5
Pinky_Curl_Middle
-90
10
Pinky_Curl_Top
-70
10
Thumb_Twist
-45
45
Thumb_Curl_Base
-10
75
Thumb_Curl_Top
-10
80
We now need to connect all
these attributes via the connection editor, so open the editor
up, and then Reload Left for the L_Hand_Control, we now
have a number of things to connect up, so here's the list,
just remember to reload right for each item : -
Inner_Spread
Connected To
Left_Inner_Finger_A ROTATE
Z
Inner_Curl_Base
Connected To
Left_Inner_Finger_A
ROTATE X
Iner_Curl_Middle
Connected
To
Left_Inner_Finger_B ROTATE
X
Inner_Curl_Top
Connected
To Left_Inner_Finger_C ROTATE
X
Index_Curl_Base
Connected To
Left_Index_Finger_A ROTATE
X
Index_Curl_Middle Connected To Left_Index_Finger_B ROTATE
X
Index_Curl_Top
Connected To
Left_Index_Finger_C ROTATE
X
Pinky_Spread
Connected
To
Left_Pinky_Finger_A ROTATE
Z
Pinky_Curl_Base
Connected To Left_Pinky_Finger_A ROTATE
X
Pinky_Curl_Middle
Connected To Left_Pinky_Finger_B ROTATE
X
Pinky_Curl_Top
Connected To Left_Pinky_Finger_C ROTATE
X
Thumb_Twist
Connected To
Left_Thumb_A
ROTATE Y
Thumb_Curl_Base
Connected To
Left_Thumb_A
ROTATE X
Thumb_Curl_Top
Connected To
Left_Thumb_B
ROTATE Z
Now you're going to need to
do the same for the R_Hand_Control, the values will
change for the opposite side, so here's a list for the right
side : -
Attribute
Name
Minimum
Maximum
Inner_Spread
-10
25
Inner_Curl_Base
-70
5
Iner_Curl_Middle
-90
10
Inner_Curl_Top
-70
10
Index_Curl_Base
-70
5
Index_Curl_Middle
-90
10
Index_Curl_Top
-70
10
Pinky_Spread
-25
10
Pinky_Curl_Base
-70
5
Pinky_Curl_Middle
-90
10
Pinky_Curl_Top
-70
10
Thumb_Twist
-45
45
Thumb_Curl_Base
-75
10
Thumb_Curl_Top
-80
10
and then in the Connection
Editor : -
Inner_Spread
Connected To
Right_Inner_Finger_A ROTATE
Z
Inner_Curl_Base
Connected To
Right_Inner_Finger_A ROTATE
X
Iner_Curl_Middle
Connected
To
Right_Inner_Finger_B ROTATE
X
Inner_Curl_Top
Connected
To Right_Inner_Finger_C ROTATE
X
Index_Curl_Base
Connected To
Right_Index_Finger_A ROTATE
X
Index_Curl_Middle Connected To
Right_Index_Finger_B ROTATE
X
Index_Curl_Top
Connected To
Right_Index_Finger_C ROTATE X
Pinky_Spread
Connected
To
Right_Pinky_Finger_A ROTATE
Z
Pinky_Curl_Base
Connected To
Right_Pinky_Finger_A ROTATE
X
Pinky_Curl_Middle
Connected To
Right_Pinky_Finger_B ROTATE
X
Pinky_Curl_Top
Connected To
Right_Pinky_Finger_C ROTATE
X
Thumb_Twist
Connected To
Right_Thumb_A
ROTATE
Y
Thumb_Curl_Base
Connected To
Right_Thumb_A
ROTATE
X
Thumb_Curl_Top
Connected To
Right_Thumb_B
ROTATE Z
That's it select either your
L or R Hand_Control, and check everything
is working ok, by selecting what you want to check in the
Channel Editor, and middle mouse scrubbing backwards
and forwards in the Persp view, or any other view, note you
can select more than 1 item to test, for instance, try
selecting Inner_Curl_Base, Inner_Curl_Middle and
Inner_Curl_Top and then scrubbing you'll see the whole
finger correspond hopefully. Well, that was quite an
intensive part to the tutorial, but at least we've now
finished with the main body rigging, note you can use these
same principles applied to a character's toes, toe spread,
etc You can download the rig, rigged up to this point
here : -
Rigging Scene - With Arms And Hands
Completed - Maya 4.5 Only - Zip File (331kb)
Before we move onto the
actual binding process, and the creation of blendshapes and so
on, we need to create the final part of our rig, and that's
the rigging for the eyes, which would mean both eyes together,
seperately, and for pupil dilation, continue on to the next
page : -
Character
Rigging Tutorial - Sixth Page
|
|
