| |
Character Rigging In Maya
Select the
LFoot_Control, we're now going to add some extra
useful attributes to our Left Foot Controller, I'll take you
through what to set up with the Left Foot, and then you can
just repeat the same functions for the Right Foot. So,
with the LFoot_Control still selected, select MODIFY
> ADD ATTRIBUTE, the Add Attribute Window will appear,
in the Attribute Name, Type Heel_Roll, and give it a
Minimum Value of -45, and a maximum value of 45 : -

In case your
wondering why -45 and 45 for the values, let me first tell you
how I calculate them, I'm adding an extra attribute to
my foot controller that controls the roll of the heel, so I
select not the controller, but the actual Left Reverse Foot
joint, and then I test it's rotations to see how much I will
require, -45 and 45 are about as much a I need for the Heel to
rotate comfortably when animating, so that is the values I
use. Click OK, now, all we've done is added the
attribute name to the Left Foot Control, you'll notice it
within the Channel Editor, now we need to actually set up the
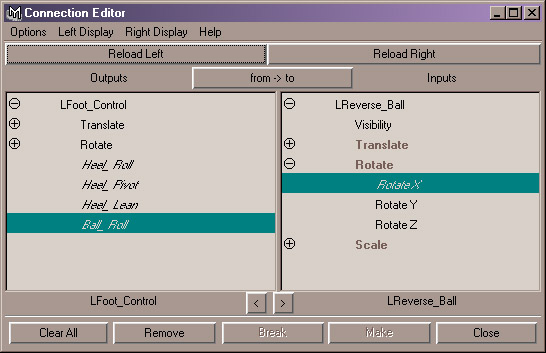
connection, so with the LFoot_Control selected, select
WINDOWS > GENERAL EDITORS > CONNECTION
EDITOR, then select RELOAD LEFT to load the
LFoot_Control, now select your LReverse_Foot joint, and then
click on RELOAD RIGHT : -

If you have a long
list within each window, go to Left Display, and switch off
Show Non Keyable, and then do the same for the Right
Display. Now in the LFoot_Control, click on the
Heel_Roll attribute we have set up, and in the
LReverse_Foot, select Rotate X : -

Close the
window, now select your LFoot_Control object, and then
in the Channel Editor, select your Heel_Roll Attribute, with
it still selected, go back to your Persp view and move the
mouse Left and Right on the screen, you'll notice you now have
control of the Heel Rotation through your LFoot_Control.
Now we need to add some more commonly used attributes to the
left foot, using the techniques shown above, add the following
attribute, Heel_Pivot with a Minimum of -30, and a maximum of
75, using the Connection Editor, connect the Heel_Pivot to the
Rotate Z of the LReverse_Foot. Again, add another
attribute called Heel_Lean, with a minimum of -45 and a
maximum of 20, then in the Connection Editor, connect
Heel_Lean to the LReverse Foot's Rotate Y. That's the
heel controls added to the LFoot_Control now, but we haven't
yet finished, create another attribute called Ball_Roll, with
a minimum of 0 and a maximum of 50, open up the connection
editor like befoe and load up the LFoot_Control, now select
the LReverse_Foot and then press the down arrow key 2 times
until you have the LReverse_Ball joint selected, then
Reload Right, then connect the Ball_Roll attribute to
the Rotate X of the LReverse_Ball joint.
That's the heel and
ball taken care of, now we just need to sort out the
toes, select the LFoot_Control and add a new
attribute called Toe_Roll with a minimum of 0 and a
maximum of 50, then in the connection editor, do the same as
before, but this time you should be loading the
LReverse_Toe joint, then connect the Toe_Roll to
the Rotate X. Next attribute to be added should
be called Toe_Pivot and have minimum of -40 and a
maximum of 30, then in the connection editor, do the same as
before, loading the LReverse_Toe joint, then connect
the Toe_Pivot to the Rotate Z. That's all
we'll require for the feet, unless you need a more complicated
setup involving toes and so on, but this tutorial is designed
to give you the basic understanding so that you can then go on
and create your own rigs. Now, you'll have to
repeat all the above steps for the right foot, taking into
account your minimum and maximum values may change from left
to right. The one's changing will be the Heel_Pivot
= Min -75, Max 30, Heel_Lean = Min -20, Max 45, and
Toe_Pivot = Min -30 and Max 40.
Once you've finished
on the RFoot_Control, we now need to one more thing,
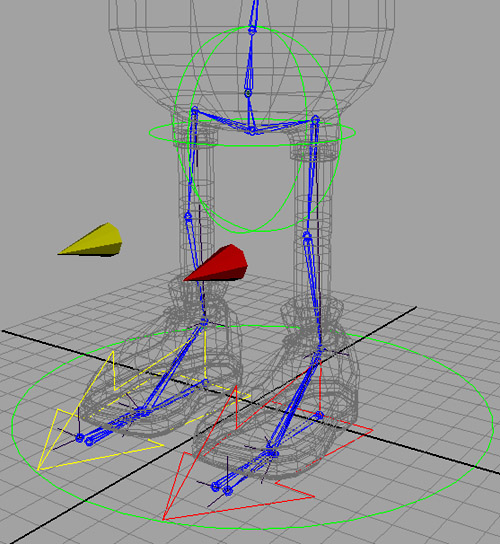
select the LKnee_PV_Constraint, then SHIFT -
SELECT the LFoot_Control and then Press P To
Parent them together, do the same on the other side, select
the RKnee_PV_Constraint and SHIFT - SELECT the
RFoot_Control and then press P to Parent
them. Ok, believe it or not, we're now done with the
legs.
Download the rig with
the legs already setup here : -
Character Rig Skeleton Setup With
Legs Done - Maya 4.5 Only - Zip File (284kb)
Now that we've finished with
the legs, we'll finish off the rest of the rigging on the
lower body before we move onto the spine and upper body
rigging. First off, we need to create our characters
main pick controller, essentially, the one controller that
will select the whole character and everything else attached
to it so we can easily rotate the whole character around and
face another direction, or place the character where we want
in a scene, so, first off, select the COG joint, and
using the same principles as we discussed earlier, in the
channel editor, select Scale X, Y and Z, And
Visibility and right click over them and select LOCK
SELECTED, then open up the Channel Control, Window >
General Editors > Channel Control and then move the
Scale X, Y, Z, And Visibility into the
Non-Keyable section. Now create a Nurbs
Circle, Create > Nurbs Primitives > Circle,
Scale it 7.5 in the X, Y and Z
Channels. Rename it to Character_World, then
freeze transformations and delete all history. Using
DISPLAY > WIREFRAME COLOUR, make it a green colour,
don't forget to add it to your defaults, and then add it to
the Rig_Controls Layer, that's it for that part,
we'll be returning to that controller towards the end of the
tutorial to actually connect it to our fully rigged character
and give us the ability to move the entire character anywhere
we wish. Now, let's build our Hip Controller, to
save you the time, I've already built one for you, you can
download it here : -
Nurbs Curve - Hip Control Visual
Icon - Maya 4.5 Only - Zip File (35kb)
Once downloaded, unpack it,
import it into your scene, and if it doesn't come across with
the wireframe coloured green, make it green, and then add it
to the Rig_Controls Layer, I've already snapped it to
the COG joint, it should already be named
Hip_Control, and you should now have something similar
to this diagram : -
We need to connect our hip
movements now to our Hip_Control, which is very easily
done, open up the Outliner, select the COG joint, then
Shift - Select the Hip_Control, then press P to Parent
them together. Note, I've
already taken the liberty of removing the scale, x, y, z and
visibility options for the Hip_Control. And
finally, select the LKnee_PV_Constraint and then Shift
- Select the Hip_Control, and then press P to
Parent them, do the same for the RKnee_PV_Constraint
too, this will aid in the knees following the hips when using
the Hip_Control. That's it, select your Hip_Control
controller, and have a little play, you should now have full
control of the characters hip movements. Now we can move
onto the upper body rigging, starting with the
spine.
Rigging The
Spine
Rigging the actual
Spine is quite an easy process, and to keep things simple,
I've purposely kept away from more complicated techniques,
which, you yourself can look at when you are feeling a bit
more confident about your rigging knowledge. From the
menu, select Skeleton > ikSpline Handle Tool, then select
the Spine_A joint, and then the SpineC joint to draw an
ikSpline Handle between them. Open up the Outliner, and
select the newly created ikHandle, and rename it to
Back_ikHandle, then with the middle mouse button, drag
it over the top of the COG_Control, this will have the
affect of parenting it, then expand the COG_Control, and find
the Spline, it should be named curve1, rename it to
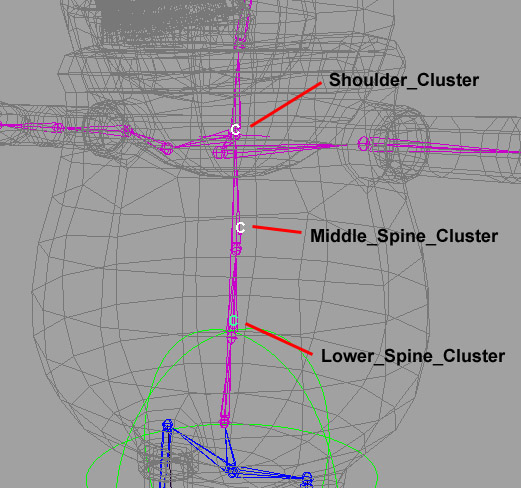
Back_Spline, and with it still selected, select
Display > Nurbs Components > Cvs, now select the
top CV, then go to Deform > Create Cluster, then
rename it to Shoulder_Cluster, it's probably an idea to
keep the Outliner open here, then select the next one down,
create another Cluster, and rename it to
Middle_Spine_Cluster, then the next one down, create a
Cluster and rename it to Lower_Spine_Cluster : -
Select the
COG_Control, and add two new attributes,
Spine_Roll - Minimum = -180, Maximum = 180, and
Spine_Twist - Minimum = -180, Maximum = 180. Then
open the Connection Editor, and Reload Left for the
COG_Control, and Reload Right for the
Back_ikHandle, then connect the Spine_Twist to
the Twist on the Back_ikHandle, and then connect
the Spine_Roll to the Roll on the
Back_ikHandle. In the Outliner, select all of the
Clusters, and parent them to the COG_Control, and then
expand the COG_Control, select them again and add them
to the Rig_Controls Layer. Select the first
Cluster you create, the Shoulder_Cluster, we only
really need Translate X, and Translate Z when
animating, so lock it's channels for all the rest, and then
use the Channel Control to move them into the Non-Keyable area
so that they don't display as we discussed earlier on the
tutorial if you need to refer back how to do this. Do
exactly the same for the Middle_Spine_Cluster and
Lower_Spine_Cluster. Add the Back_ikHandle
to the Skeleton_L Layer. We need to create a
better way of selecting those Clusters for the spine, so
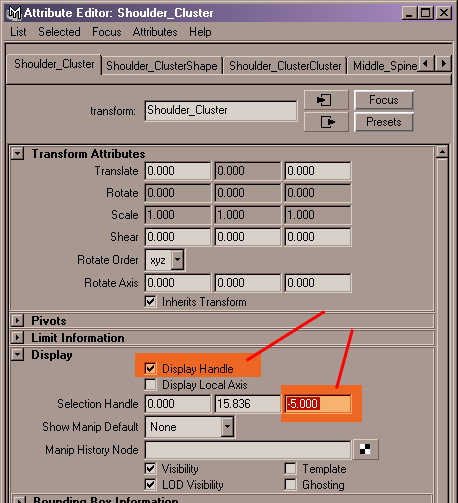
select the Shoulder_Cluster, and then press CTRL +
A to open the Attribute Editor for it, set the Cluster
Attributes to Relative (Specifies whether the cluster
deformation occurs only when the cluster deformer handle
itself is transformed (moved, rotated, or scaled). With
Relative on, only transformations to the cluster deformer
handle itself cause deformation effects. Transformations to
any objects parented to the handle do not cause deformation
effects. With Relative off, transformations to objects
parented to the cluster deformer handle can cause deformation
effects), select the Shoulder_Cluster tab, and then
expand the Display Section, select Display Handle, and
in the Numeric boxes, change the third one's current values to
-5, so that the Handle actually resides outside of the
characters body, and hence easier to grab. Now do the
same for the Middle_Spine_Cluster and the
Lower_Spine_Cluster using the same -5 value.
Now we'll add a control for
our Head : -
Character
Rigging Tutorial - Fifth Page
|
|
