| |
Character Rigging In Maya
Parenting and
Mirroring our final joints
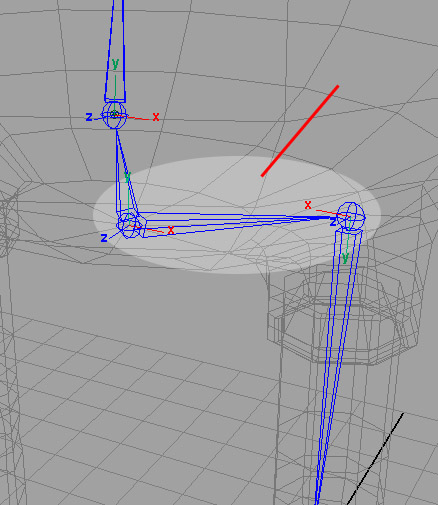
Select the
LHip joint, and then Shift Select the COG joint,
now press P to parent the LHip to the COG Joint, a bone
will appear between them : -
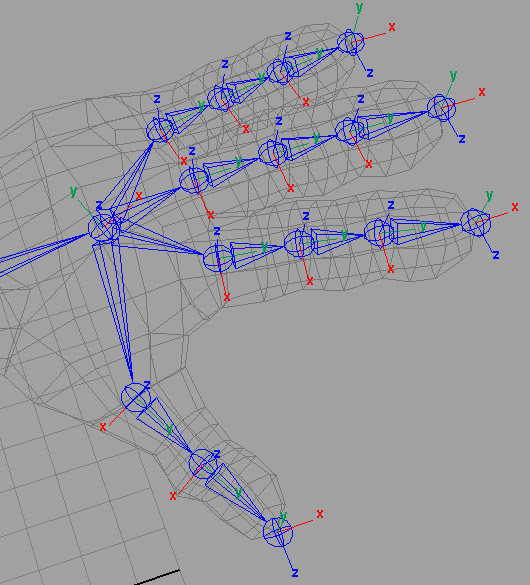
Now do the same with
the Left_Clavicle and Neck joint, and then again
with the first joint on each of the fingers and the thumb and
parent to the Left_Hand joint, you'll end up with
something like this : -
Ok, we've now set up
and parented all of our joints, now there's one last thing to
do now before we've finished with the skeleton, and that's to
Mirror our Joints from the Left Side over to the
Right Side. Select the Left_Clavicle joint and then
from the menu select Skeleton > Mirror Joint and open the
options box, within the options, select YZ as the Mirror
options and Orientation as the Mirror Function : -
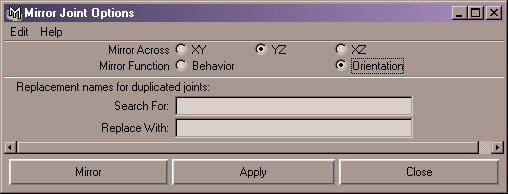
Select Mirror, and
you should now have the right arm set up, including the
parented joint :-

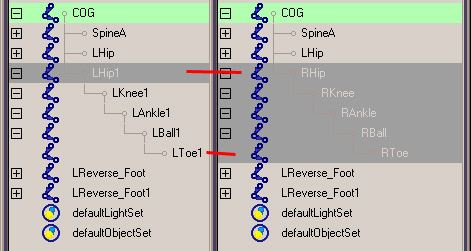
Do the same now for
the LHip and then again for the LReverse_Foot, that's it, we
now have all of our joints mirrored across. We don't
need our Local Rotation Axes displayed anymore, so select each
joint one by one, and then issue the command DISPLAY >
COMPONENT DISPLAY > LOCAL ROTATION AXIS, or press G to
repeat the last command. Once you've done that to all
the joints, open up the Outliner. We need to rename our
joints that we have mirrored across, essentially we need to
differentiate the two sides, so Left and Right is enough to do
that, so rename all the mirrored joints so that they are
R - Right related, as in : -
Do the same for the
mirrored reverse foot and also for the mirrored arm including
all the fingers and thumb. A bit of tedious task but
worthwhile in the long run. In cases where you have a
number 1 at the end of the name, just remove it. That's
it, we're officially finished with the skeleton setup, now we
can move onto the juicy part, the
rigging..... If you need to, you can
download the character with the skeleton setup already here :
-
Character Rigging Skeleton Setup
- Maya 4.5 Only - Zip File (282kb)
The Rigging
Process
Now we'll start the
actual rigging process, now before we continue, I'd just like
to point out that you should be used to saving your work quite
often, and getting into the habit of creating new files, just
so your not saving over the same file again and again, and if
it crashes you'll have no backup. Anyway, back to the
subject matter, we'll first begin with our characters legs,
seeing as how we already have the reverse foot joints in
place. Now, just for the rigging controls and so on,
create a new layer, and call it Rig_Controls.
The
Legs
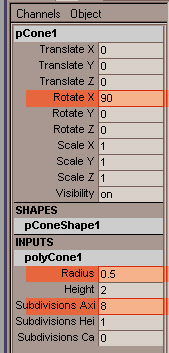
First, we need to
create some poly objects, select CREATE > POLYGON
PRIMITIVES > CONE, and in the channel box, change the
values so that they are the same as the following diagram :
-
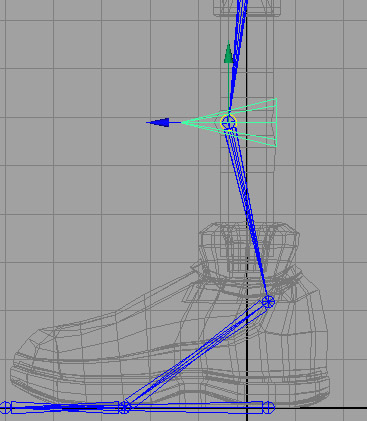
In the side view,
snap the object to the knee joint : -
Press CTRL + D
to Duplicate the object, and in the PERSP view, snap to the
other knee, now select both objects, and in the Channel Box
again, change the Translate Z for each to 5. This will
move the knee controllers in front of the Knees. Select
MODIFY > FREEZE TRANSFORMATIONS, and then EDIT
> DELETE BY TYPE > HISTORY. Add both objects
to the newly created Rig_Controls Layer, select the
Cone in front of the Left Knee and rename it to
LKnee_PV_Constraint, and again select the Cone in front
of the Right Knee, and then rename that one to
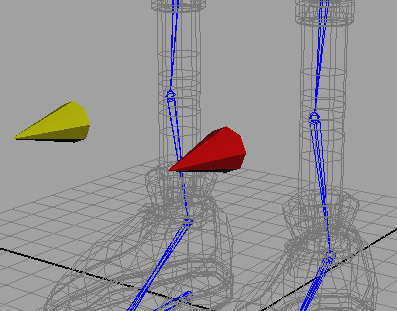
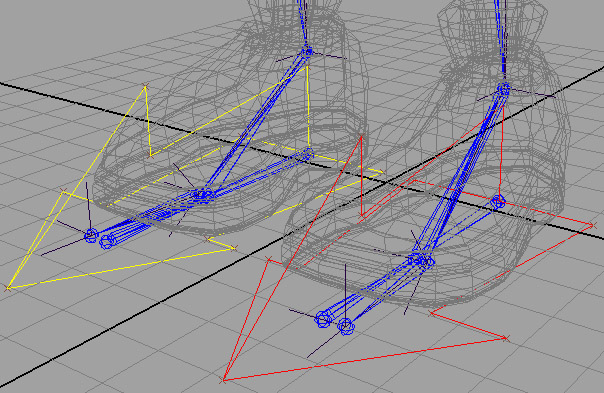
RKnee_PV_Constraint. One more thing, open your
Hypershade, and create two new Lambert materials, rename them
Left_LambertM and Right_LambertM, make the
Left_LambertM a Red Colour, and the Right_LambertM a Yellow
Colour, now apply the materials to the appropriate Knee
Controllers, don't worry, it doesn't mean anything, it's just
a quick visual way of determining left and rights sides :
-
We're now going to
create the first part of our IK Setup for the leg, select
SKELETON > IK HANDLE, you now need to select the
LHip Joint, and then the LAnkle joint, select
the IKHandle once done and rename it to ikHandle_LAnkle
: -
Now, do the same on
the other side, RHip to RAnkle joints, select
the IKHandle and rename it to ikHandle_RAnkle.
Select both IKHandles and add them to the Rig_Controls
Layer. Select the geometry LKnee_PV_Constraint, and then SHIFT - SELECT the ikHandle_LAnkle. Now select
CONSTRAIN > POLE VECTOR, now select the LKnee_PV_Constraint and try moving it left and right, you'll
find the knee is constrained to it, press Z to undo any
movements you may have added. Do the same now for the
RKnee_PV_Constraint
and ikHandle_RAnkle. For the rest of the leg
setup, I'm going to go through the process for the left leg,
and then you can repeat the process yourself for the right
leg. Select the LReverse_Foot joint, if you've
been following this tutorial it's Translate X, Y and Z values
in the channel box will be about X = 2.243, Y = 0 and Z =
-0.44, make a note of what the X value is and then change the
X value to 5, this is just to get it out of the way whilst we
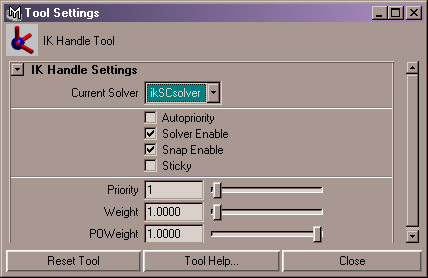
are working on the other joints, now select SKELETON >
IK HANDLE TOOL, and open the options box, and change the
IKRP Solver to IKSC Solver (Single Chain Solver)
: -
Once you've done
that, select the LAnkle joint and then the LBall
joint, the ikSC Solver will be created, select it and
rename it to ikHandle_LBall, and then add it to the
Rig_Controls layer. Add another IK SC Solver from
the LBall joint to the LToe Joint, rename it
ikHandle_LToe and add it to the Rig_Controls
layer. Remembering the value you noted earlier for the
LReverse_Foot, type it in and put it back to it's
default position. Select the ikHandle_LAnkle and
then SHIFT - SELECT the LReverse_Ankle, and then press
P to Parent them, if it's easier for you, you
can do this in the Outliner. Now do the same for the
ikHandle_LBall and the LReverse_Ball, and then
again for the ikHandle_LToe and the
LReverse_Toe. Select the LReverse_Foot
Joint, and try moving it around, you'll find you now have
control of the whole foot, try moving it backwards and
forwards, and also try moving the knee controller with it,
you'll see straightaway the benefit of using a reverse foot
setup. Once you are happy with what you have, repeat the
whole process for the Right Leg.

We don't really want
to be selecting joints every time we animate, we ideally want
things as easy as possible to just visually grab and away you
go. We have vsiual objects that we can grab for the Knee
controls, now, let's set up some for the Reverse Foot Setups
for the left and right sides. First off, rather than
this becoming a modelling tutorial, download the following
scene file :-
Feet Controllers - Maya 4.5 - Zip
File (22kb)
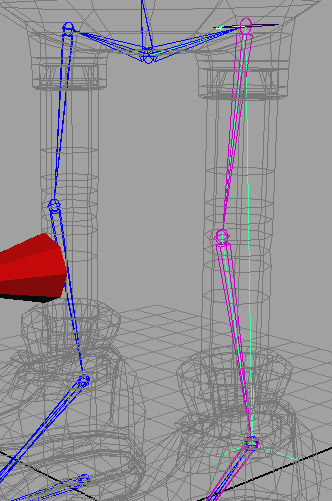
Once you've
downloaded the file, unzip it and then import it into the
current scene. Once you've imported the scene in, you
will notice two new controllers at the base of the feet, note
they are coloured, first thing to do is add them to the
Rig_Controls layer, if you have coloured this layer,
remove it, otherwise the wireframe colouring won't work, and
both controllers will appear the same colour. Note, if
you load them in, and they are two different colours, just
recolour them again, by using DISPLAY > WIREFRAME COLOUR,
add the two colours you require, red and yellow and click on
Default. You should have something like this now within
Maya : -
Now the easy part,
select the LReverse_Foot, and SHIFT - SELECT the
LFoot_Control, then press P to Parent it,
do the same for the RReverse_Foot and the
RFoot_Control, now grab either controller and try
moving it around, you'll notice that we now have full control
for each leg for both left and right sides. Remember to
press Z to undo the last command, just to make sure you go
back to your original location each time. Now, just some
more small things to do before we carry on with the foot
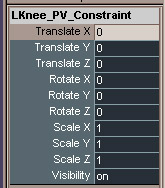
setup, select the LKnee_PV_Constraint, you'll notice
that in the Channel Editor you have access to Translate X, Y
and Z, Rotate X, Y and Z, and Scale X, Y, Z, and the only one
we will be using when animating is actually the Translate
X Channel, so we need to set this up so that we don't have
loads of uncessary keyframes being set on the other channels,
and also to keep our Graph Editor a lot more tidier, so in
essence, we only want that Channel to be
accessible. So, select the LKnee_PV_Constraint, now left mouse drag over
the following channels : -
The right click over
your selection, and choose Lock Selected, you'll notice they
become greyed out, now try scaling or rotating the object, the
manipulators that usually appear for Scale or Rotate are also
greyed out, now that would be fine, but let's tidy this up
further, with it still selected, select WINDOW > GENERAL
EDITORS > CHANNEL CONTROL, you'll have two sections,
Keyable and Non - Keyable, select the same
channels you had selected in the channel editor in the Keyable
section : -
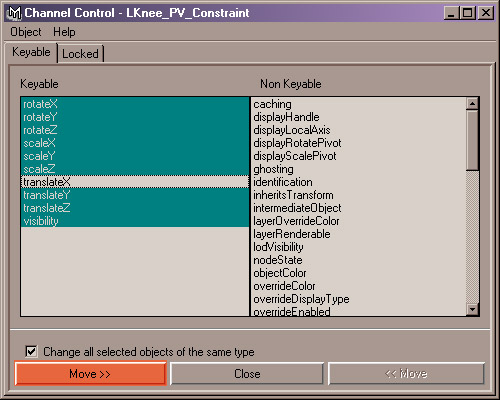
And then press the
MOVE >> button, you'll now notice in the
Channel Editor that you now only have the Translate X channel
to choose from and animate with, making things much easier and
more logical for you to work with, now repeat this for the
RKnee_PV_Constraint. You can now also do the same for
LFoot_Control and RFoot_Control, from these two,
we probably won't be using Scale X, Y, Z and
Visibility, so get rid of them too. Ok, now we
can return to setting up the rest of our foot setup, please
continue onto the next page : -
Character
Rigging Tutorial - Fourth Page
|
|
