| |
Final Gathering - Maya / Mental Ray
What is final
gathering?
Final Gathering -
Final Gathering is computed from the point of view. When
the primary ray hits the point on an object, final gather is
activated and a series of rays are diverted at random angles
into the scene to calculate the light energy (colour
information) to be calculated around the point for which we
are computing colour for. This information is stored in
the photon map. The photon map is then consulted and is
used to add the effect of the bounced light in the ray-tracing
process, this, essentially turns every object into a light
source.
Maya / Mental Ray Final
Gathering Tutorial
First off, and most
importantly, switch off Maya's default light. To do
this, select Maya's default Render Globals, Windows >
Rendering Editors > Render Globals (Maya Software)
...., now scroll down to the Render Options, and
open them up, now find Enable Default Light, and
deselect it. This will ensure now that you have no other
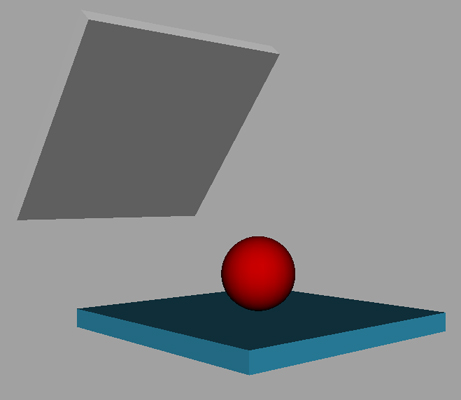
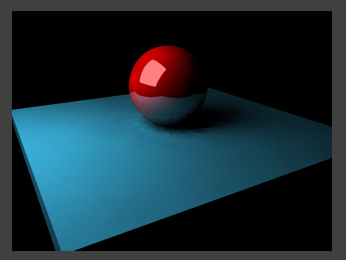
lighting in your scene. Ok, let's start with a simple
scene, a polygon sphere on a poly plane, with the same poly
plan duplicated and moved up a little to provide the
'lighting' in the scene : -
Material wise, I've used a
Lambert for the poly plane, diffuse set at 8.00, All
Translucency options set to 0, for the sphere, I have used the
following values : -
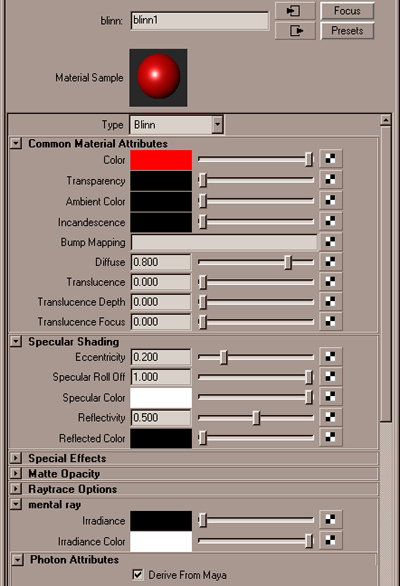
And for our 'Light' object,
I have another Lambert material, with Translucency options all
set to 0, diffuse set at 1, and Incandescence set to 1 (full
white). Ok, don't worry about the values too much so
far, we'll return to them later.
Now we're going to set up
the final gathering, Press F5 to go into the Rendering menu
subset, now select Render > Render Using Mental
Ray. Open up the Render Globals, the tab where it
says mentalrayGlobals, scroll down to the
Quality section. Open it up and where it says Render
Quality, select the box at the end. This will take
you into mentalrayOptions1, now find the final gather
section and open it, click on Final Gather to set it up, now
you will have some options available to you, Final Gather
Rays, Min Radius, and Max Radius. These are
currently set at 1000, 0.000 and 0.000 respectively, we are
going to change these values, so they are more in line with
what we require in our scene. Now Final Gather Rays, set
to 300 (we will change this again later). The
Minimum and Maximum Radius can be set up using
the following calculation which is based on scene size, the
general rule is, the Maximum Radius should be set at
5-10% of the scenes size (in Maya Units) , to do
this let's quickly use the Measure Tool In Maya, go to
the top view, then go to Create > Measure Tools >
Distance Tool, and grid snap the following way : -
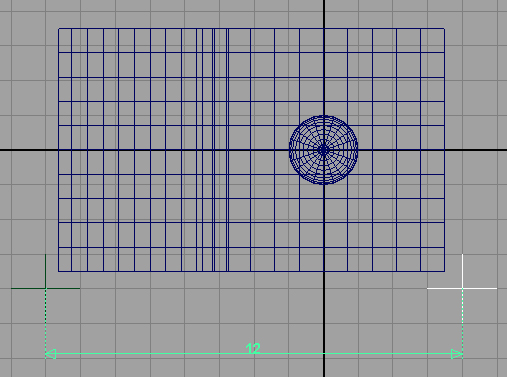
so, from that we can see our
scene size in units is 12 units (always go for the
bigger measurement in non square scenes), so from the
calculation above, that means our Maximum Radius should
be set at 1.2, Now to calculate the Min Radius,
the Min Radius should be set at 10% of the
Maximum Radius, so that means Minimum Radius
should be set at 0.12. Ok, now let's try a quick
render.
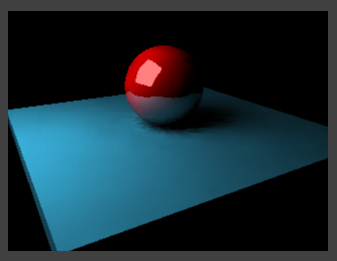
ok, that's not too bad,
we're getting somewhere, now open up the standard Render
Globals for Mental Ray, and scroll down and beneath Final
Gather is Sampling Quality, open this up and make sure you
have the following values entered, for Minimum Samples,
set this to -2, and for Max Samples, set this to
2. Now re-render.
Now, that's looking much
sharper around the edges and cleaner than the previous
version. Unfortunately, the shadows are looking a little
blotchy, go back to the Render Globals, and increase
your Final Gather Rays to 1000, to increase the
quality of the final gather, (the more rays, the longer render
time), also in the sampling quality options, switch on
Jitter, this helps reduce banding problems, and whilst
your at it, change the filter type from Box to Guass
Filter, defaults are fine, too much and your scene will
just look blurred, set Scanline (Scanline will render
parts of the scene that don't need raytracing) to off
within the Rendering section, and re-render : -

Now, you can see where we're
going with this, the blotchiness has been reduced and overall,
the image is much more pleasing to the eye.
In this final test render, I
have set the Final Gather Rays to 5000 Rays,
probably a bit much, as I take a hit on rendering time, but
the shadows are much more pleasing : -

Tips : -
(A) Within
each objects material, there is a mental ray tab,
within this are some extra options, the Irradiance, and
Irradiance Colour. The option we are most interested in,
is the Irradiance Colour, this basically controls how much
'lighting' an object will receive, it is currently set at pure
white, which means it get completely illuminated, lowering the
values helps you to work out how much final gather effect an
object receives in a scene, for instance, in the example
above, if we increase the size of the 'light' object, i.e. the
object for which we have mapped white into the incandescence,
the scene in itself receives more 'lighting', now to
counteract the extra light in the scene, we can do one of two
things, open the materials attributes and within the Mental
Ray tab, change the Irradiance Colour to a lower value, and so
receive less 'light', essentially your 'balancing' out the
extra light in the scene, or alternatively, if you increase
the size of the 'light' object, you can also lower the
incandescence value, which will globabally lower the lighting
effect.
Also, there is the Photon Attributes,
these are normally fine and not worth tampering with, so the
'Derive From Maya' is usually the best option here.
Similarly, Within each objects attributes
section, there is also a Mental Ray section, where you can
change it from 'Derives From Maya' to your own options, where
you can set up useful things like whether or not an object can
cast or receive photons, or do both, useful when using Global
Illumination, so you can set up, say a ring object, to be an
object casting caustics, but not receiving them.
(B) Within the
attribute editor for the Mental Ray globals, there is a
section called Translation, open this section up, now, where
it says Export Verbosity, you will notice that as a
default it is set to 'Warning Messages', change this to
some of the other options for very useful information
available in your Maya Output Window, for instance, changing
this to 'Info Message' will give you all sorts
of information/statistics about your scene, which are quite
helpful, but one that most 3d artists would find useful would
be the frame render time, allowing you to see 'exactly' how
long it took a scene to render.
(C) BSP - Binary Space Partition, The BSP is the way
Mental Ray partitions a scene down into workable chunks in
memory, process it and move onto the next chunk. So, in
the Mental Ray Render Globals, in the Memory and
Performace section you will find options to alter the way
the BSP tree is used, there are three options available :
-
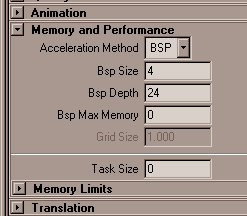
BSP Size, BSP Depth
and BSP Max Memory. Don't worry about BSP Max
Memory, the BSP Size is the number of triangles in
a scene voxel that Mental Ray will process, and the BSP Depth
is the maximum number of times Mental Ray will subdivide to
get to this depth. A Setting of 4, 5 or 6
works best for Size, and for Depth, you can use
1 of 3 different values, 25 for scenes containing light
geometry, 40 for medium, and 55 for scenes with
heavy geometry. Going over a value of 60 will give you a
performance hit on your render times.
(D) Colour
Bleeding - Now, remember, right at the beginning of this
tutorial, we switched off our default light to start with,
this was essentially to make sure we were concentrating on
only 'object' lights and to make sure there was nothing else
'external' affecting the scene, if we had have left the light
on, our objects would also have shown colour bleeding, i.e.
what this means is, if I had a yellow box on a white plane,
you would probably notice that where the white plane is near
the yellow box in line with the light, there would be colour
bleeding, basically, you would be seeing yellow illumination
on the white plane. Now this can be a wanted or unwanted
affect in your scene, for those that wish to make use of
colour bleeding, I'd recommend using a light or more (up to
you the user and your scene requirements). See the
figures below for examples : -
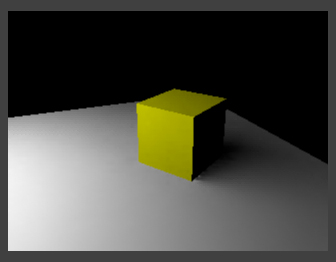
Here we have a quick test
render with no lights, only 'object' illumination
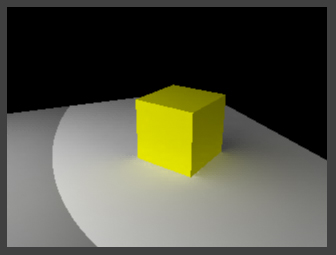
And in this figure, we
have a spotlight added (0.5% Intensity), notice the yellow
colour bleeding the plane object.
This can lead to some very
realistic lighting within your scenes if used
correctly.
Thanks for reading and I
hope you find this tutorial useful.
|
|
