|
Introduction:
Slim templates are the Tcl scripts stored in .slim file
format to add functionality to Slim. Templates will be loaded during Slim
bootup and generate the user interface for each shader. Using templates,
TDs can quickly share custom shaders with artists don't know how to code
or what a shader is. This article is a step-by-step guide about how to install
templates and make the functions available in the "Create Appearance" menus
of Slim.
Step 1:
Copy the .slim file to $RATTREE/lib/slim where loads
of standard templates being stored. $RATTREE is the install location of RAT(
e.g. D:\Pixar\rat-6.0 ).
Step 2:
Open the .slim file in a text editor. See the lines:
slim 1
extensions zhangdb {
extensions zhang pxsl {
...
}
}
|
Where zhang is the author or vendor of the template. There
can be more than one templates in a single .slim file. For example:
template
surface aceSkin {
...
}
|
It is a surface type shader named "aceSkin".
Step 3:
Edit $RATTREE/etc/slim.ini to tell Slim loading your template along with
the standard ones. Find the line :
LoadExtension
tcl [file join [RATGetDir etc] SlimExpression.tcl]
|
Add your line bellow it:
LoadExtension
slim [file join $templates yourfile.slim] slim
|
Look though the lines and find the following code:
SetPref
CreateAppearanceMenu {
...
}
|
That is where Slim generates its "Create Appearance" menu
items.
{ _cascade
Surface {
pixar,SurfaceAdaptor#0
pixar,AdditiveFX#1
pixar,Blinn#1
pixar,BrushedMetal#0
pixar,Cel#0
pixar,Ceramic#0
pixar,Clay#0
pixar,Constant#0
pixar,Default#0
pixar,DIY#0
pixar,FresnelPlastic#0
pixar,Glass#0
pixar,Gooch#0
pixar,IBI#1
pixar,Jewel#0
pixar,SMImageFile#2
pixar,Layer#1
pixar,LayerOptimo#0
pixar,Matte#0
pixar,Metal#0
pixar,Mix#0
pixar,Plastic#0
pixar,Skin#2
pixar,SwissArmy#1
pixar,ThinPlastic#0
pixar,Velvet#1
zhang,aceSkin#0
}
}
|
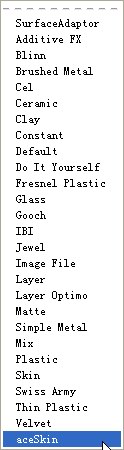
Find the lines indicate the surface shaders inside the brace,
and insert a line of aceSkin. If you have other types of shaders like light,
color, or float, add lines to correspond categories.
Step 4:
Save slim.ini file and restart Maya to check if
there is any new menu items.
|