| |
Sprite - Based Particle Trees
Sprite - Based Particle
Tree's offer a much better looking tree in today's real time
games. I would personally not normally recommend these
types of trees' as 'overall' coverage in your
real time game, but when used in conjunction with the normal
cross-sectional type tree, can be used to great effect.
These kinds of trees' are highly recommended to be used in
area's of your game where you want most visual impact, on a
corner of a track, lining a field nearby, etc.
Let's get straight into how
you create these types of trees, first off, I'm using Maya,
but the theory can be utilised in any 3D package available
today.
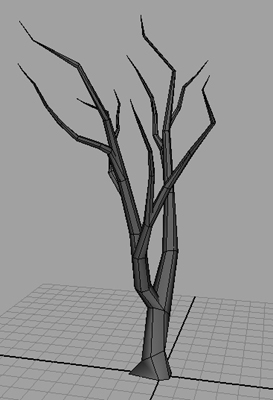
Firstly, in Maya (or your respective 3D
package), create your base model, your base model is
essentially the tree trunk, for which we will later apply the
sprite particles. For quickness , I have a tree trunk
that I built earlier.
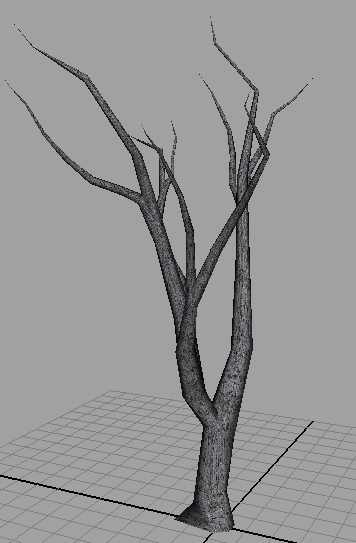
Also, again, for quickness I
haven't spent the time to UV Map the tree properly, as I
really only want to show the technique here rather than a
step-by-step process on creating a tree. So, for this
example I have only unitised the UV's on the tree and applied
one 128x128 texture map to it, as seen below.
Download The Maya (4.5)
Scene File : -
Maya
Scene File
So, you can create your own
and texture it, or download the version I have above.
Now we'll move onto the next part, which is probably the most
interesting part as this is where we will add our sprite based
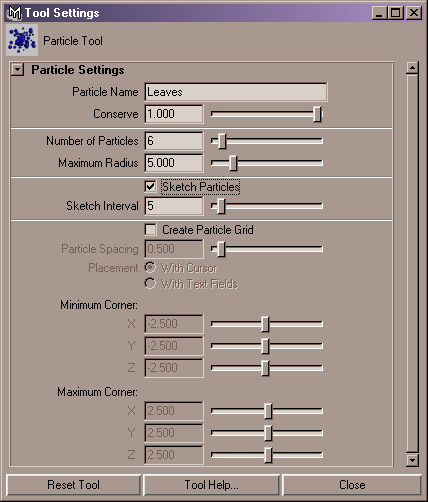
particles. First off, in Maya Press F4 so that
you are in the Particles Menu, and then go to
Particles > Particle Tool, open the options box,
type in the Particle Name as something you will recognise,
i.e. Leaves. Change the number of particles to say,
6, more or less depending on your needs within the
scene. Now change the Maximum Radius to 5,
again, variable depending on the size and scale you are
working at, so a little testing may be in order first to
determine the best sizes for you, the values I give above will
work fine n the downloaded scene file. Now finally,
select the Sketch Particles so that it is turned on,
this will allow us to draw our particles where we want them
onscreen, which is very important for the next part.
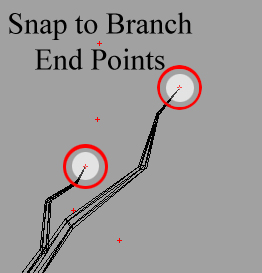
Now that you have done all
this, turn ON 'Snap To Points', it's the icon at
the top with the magnet and dot : -

Zoom in on the top of the
tree branches in Maya, and start snapping particles to the top
of each branch tip, because you have snap to points switched
on, it will snap perfectly to each tip, do this once for each
branch tip, pressing Enter after you have snapped to
each branch tip vertex, because you are pressing Enter each
time you snap once, you will create 9 particle sets in total,
named Leaves1-9 respectively, you will need to run the
last command each time you press Enter, and change the named
accordingly, Leaves2, Leaves3, etc or you can select the last
command used from the side which should have the particle tool
selected, doing it this way is quicker, but you will need to
rename the newly created particles, as they will be currently
named particle1-8, there's no great need for renaming
but it may help for clarity, anyway, your probably wondering
why you couldn't just draw them all in one go, if you did you
would've had problems scaling them later : -
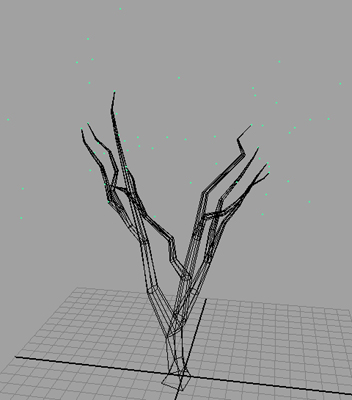
Continue until you have
drawn a point at each branch tip, because you have set the
amount of particles to 6, and the spread radius to 5 you will
also have particles that are away from the tree too, this is
ok, and will aid in the 'look' of the tree later. Now
you should have something similar to this diagram when done :
-
Now, the important part,
with your current Particle object still selected
(Leaves), press CTRL + A to bring up the Attribute Editor for
it, if you're not in the LeaveShape TAB, change to it now, and
scroll down until you find the Render Attributes
section, open it up and where it says Particle Render
Type (it will be currently set to Points) change it to say
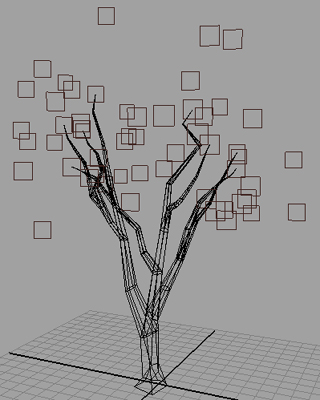
SPRITES. You will notice that your particle
points change to sprites (square boxes) within your scene, now
do the same for the other particle objects, changing them all
to sprites.
Now, we need to adjust them
a little first before the next stage, as currently they're not
the correct size. You should have something currently
looking like this : -
Ok, open your Outliner,
Window > Outliner, and select your first particle
object, Leaves, now press CTRL + A to open it's
attribute editor, scroll down until you come to the Render
Attributes section again, click on Depth Sort so that
it is on, and now click on the box that says Current Render
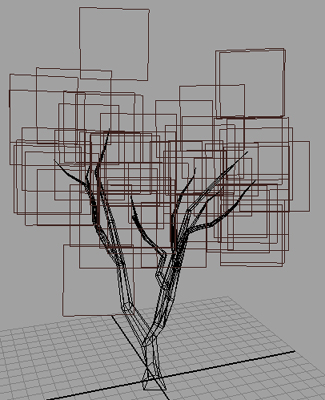
Type. Once opened, set the values for both Sprite
Scale X and Sprite Scale Y to 6, repeat
again for the other particle objects until they are all
done. You should now have something similar to this
diagram : -
Great, now we're getting
somewhere, not much further to go now. Open up your
Hypershade and create a new material, a Lambert
Material is fine, now open up your Outliner, select all the
particle objects, and then right click on your newly created
Lambert Material (Best to name it where possible, I used
Tree_Leaves_LambertM) and then select Assign
Material To Selection, press 6 in your
perspective view to put it into Textured Shaded Mode, now
deselect everything. Go back to your newly created
material, the Tree_Leaves_LambertM and double click on
it to display it's attributes, now make sure you have a
texture to hand, ideally a texture which contains an alpha
channel and has something similar to tree leaves within
the texture, now map this texture into the COLOUR node
of the Tree_Leaves_LambertM. Now you should get
something similar to this : -
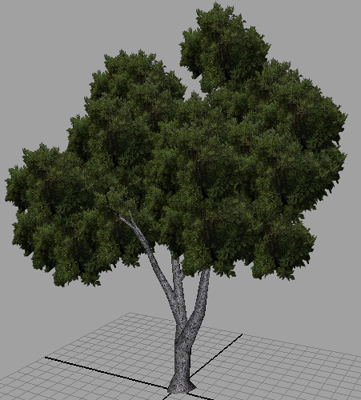
Try rotating the viewport to
get an idea of how the tree will work, if you are getting a
lot of popping don't worry about it too much, as the
programmers will be able to do lot's of fancy sorting
algorithms within the engine you are designing this for.
Now that's it really, as simple as that, and these kind of
tree's look great, just look at some of the games using these
types of tree's to see what I mean, Ridge Racer for
example.
Download The Maya (4.5)
Final Scene File : - Maya
Scene File
NOTES : -
Now, some important stuff, here's some tips and
techniques to add to this tutorial : -
You can change the particle
objects to plain old polygons and texture them the say and
mark them with with a special name which will be recognised by
your programmers, for instance, Leaves_CF, the
_CF could be used as a flag within the game engine, so
that the programmers would know to set 'those' particular
polygons to always camera facing.
If you stick with the
particle route (although this can also easily be done with
polygons) you can animate the leaves (particle/polygon
objects) to gently sway in the wind and so on.
Thanks for reading and I
hope you find this tutorial useful.
|
|
