| |
HDRI - Maya / Mental Ray
What is
HDRI?
The acronym
HDRI stands for High Dynamic Range
Image, essentially,
HDR Images are images that have a dynamic range
far greater than the 0-255 range that we are currently
used to using in our traditional computer based images, this
means that images using the 0-255 range cannot display
the dynamic range accurately (The contrast ratio between
darkest and brightest regions).
An HDR Image has an
important property in that their pixel values are proportional
to the amount of light in the world corresponding to that
pixel, unlike most regular images whose pixel values are
nonlinearly encoded, HDR pixels use floating point
numbers, which are capable of representing light quantities of
one to a million and beyond. As mentioned earlier,
Low Dynamic Range Images usually represent pixels using only
eight bits per channel, with the pixel values ranging as
integers from between 0 and 255 respectively.
Because of the greater range capable of
within HDR Images, these types of images are able to store
accurate lighting values, and by using these images in
conjunction with Global Illumination, Final
Gathering, etc, you can produce extremely realistic and
warm looking images than that which could be created with a
low dynamic range.
For more information on HDR Images,
see the following website : - http://www.debevec.org
Maya / Mental Ray HDRI Tutorial
Ok, If you've
read
on using Final Gathering with Maya / Mental Ray,
you'll already have an idea of some of the concepts
behind using Mental Ray within Maya and how to effectively
set up a scene. In this tutorial, we'll be
utilising the scene from, which you can download
from here (Maya 4.5 only) : - Scene
File (Zip File - 39kb), once you've downloaded
the zip file, extract the contents, we're going
to be adding some extra's to this scene during the
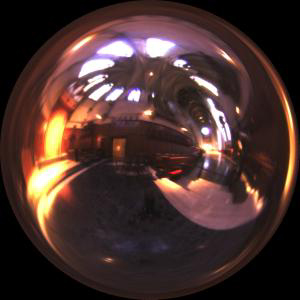
tutorial. Now before we continue, I'd recommend
first downloading a nice HDR Image, there's a good
collection which can be found at this site : -
http://www.debevec.org/Probes/
, for the purpose of this tutorial, let's go for
a nice warm looking image, download the Grace_Probe.hdr,
as shown below : -
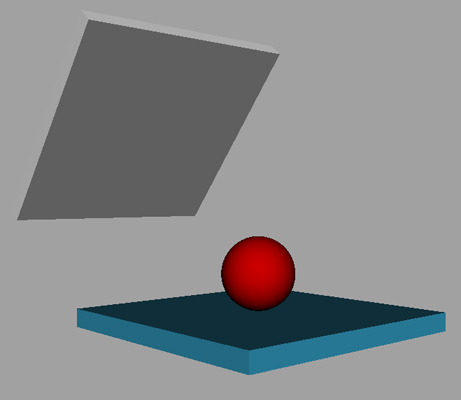
Ok, now that we have our HDR
Image, it's time to load up the scene. You
should now have something similar to diagram below
within Maya if you've downloaded the scene : -
Now if you do a quick
render, you'll probably see something like this : -
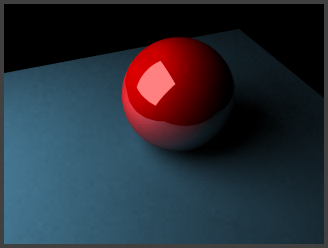
The quality is a little
blotchy, but that's not a problem right now, we can 'up' the
final gather rays in the final render.
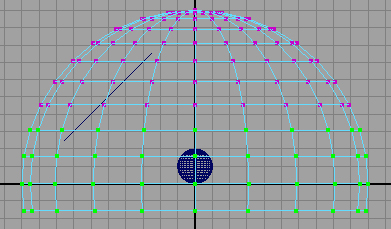
We are now going to add an
extra object to the scene, a half dome, select Create >
Polygon Primitives > Sphere, a sphere should appear
within your scene, select the sphere and increase the
radius to 10, so that it encompasses the scene,
now, in the front view, select the polygons just below
the half way mark, but not at the half way mark and delete
these faces : -

You will now be left with a
dome shape or half sphere, now the important part, select the
sphere, and then go to Edit Polygons > Normals >
Reverse. The reasoning behind doning this is so that when
we map our image onto the dome, the normals are pointing in
the right direction for illumination to be correctly
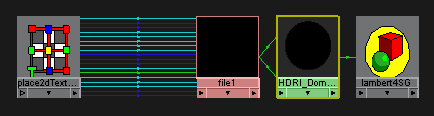
calculated. Create a Lambert Shader, and assign it to
the dome, now open it's Attribute Editor, and click on
the box in Lambert tab next to Ambient Colour,
in the 2D Textures section, select File and then find the
.HDR Map we downloaded earlier, if you cannot view it
inside Maya, select Best Guess(*.*) In The Files Of
Type section in the open dialog box. Once you've
done this, do the same as before, only this time add it to the
Colour channel of the Lambert node.
Now select your dome shape,
and go to Edit Polygons > Texture > Planar
Mapping, go to the options box, set it to Y axis
and then ok, with the object still selected, open the UV
Editor, leave it open, in the front view, select the following
UV points : -
Now, scale and then deselect
the UV's in their rows, until you get something similar to
this in your UV Layout : -
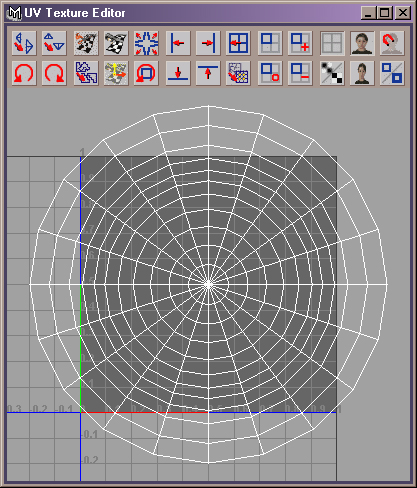
Select ALL Uv's now and then
scale them so that they fit exactly into the 0 to 1 UV Space
(the grey square in the diagram above), what we've essentially
done is made sure that our UV layout is utilising the whole of
the HDR map correctly, by relaxing the area's where the map
would've been stretched. Now the beauty of HDRI is
mostly found in the lovely reflections it's produces as well
as it's lighting, in this case, we will now convert the plane
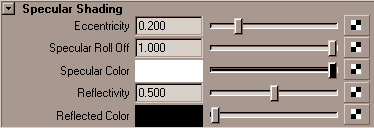
the red ball sits on from a Lambert to a Blinn, this is easily
accomplished, select the plane, open it's Attribute Editor and
in the Lambert tab, change the type to Blinn, now with added
new specular attributes, set them up as follows (similar to
the red ball's attributes) : -
I haven't mentioned this
yet, but it's worth taking note now that Maya will not
actually display the HDR map, Mental Ray recognises the map,
but Maya doesn't hence it not displaying. Ok, we're
about ready now to do a test render, but first we must make a
few small changes to our scene, you'll remember from the final
gathering tutorial that the Min and Max samples are based on
the scene size, well this has changed since we added our dome,
so recalculate for the scene, I come out with 20 units, so
that's 2 for Max and 0.2 for Min, so open the Mental Ray
Render Globals and in the FG section, make the necessary
changes. Change the final gather rays to 500, just for
viewing purposes too. Now delete the white plane object
from the scene that is currently illuminating it, as we want
to just concentrate on the HDRI effect. And perform a
test render : -
Ok, not bad, but not
great, how can we improve the look? It's blotchy, but we
can increase the samples later to fix that, in the meanwhile,
decrease the plane's reflection value to just 0.3, it's
also a little dark, so select the dome and within the
Hypershade, graph the material : -
Select the file node and
open it's attributes, and within the Colour Balance section,
click on the Colour Gain's 'colour' box : -
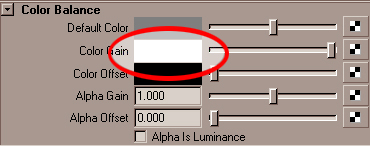
Once you've done that,
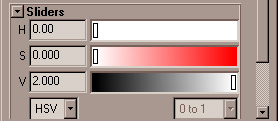
increase the V value in the H S V section to 2 : -
Now, let's try another
render : -
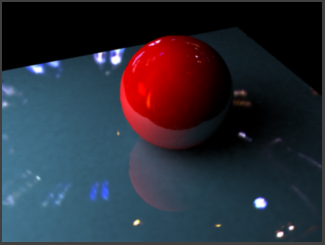
Now, looking a bit better
than before, let's try a different HDR Map that will show off
the scene a bit more, in this case, the HDRI map being used
here is already quite bright, so I set the Colour Balance back
a little - HSV Value V to 1.5 : -
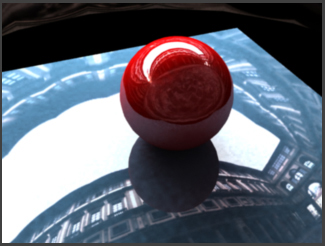
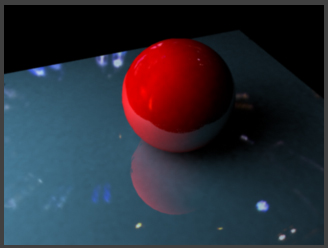
Now, that's looking quite
nice, the HDRI map has helped to achieve a fairly good, very
realistic looking scene due to the lighting range
available. And in this final
test, I've increased the size of the plane so that it overlaps
the dome, just to fix the reflections a little, I've changed
the plane to white and changed it back to a Lambert, and the
ball has had it's reflection value upped a little bit more
too, and I've increased my render time a bit more by upping
the final gather rays (1500), and within the globe's attribute
editor, I've changed the shape nodes render stats as follows :
-
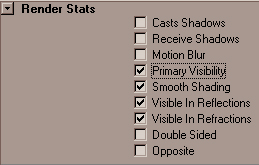
Note Switch off 'Primary
Visibility' if you don't want the globe to appear in renders,
but still affect the scene : -
And the final test render :
-
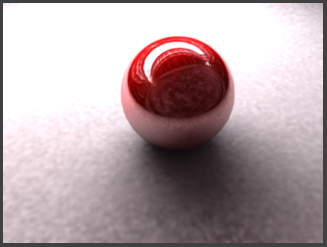
I'd agree, it's not the best
quality in the world, and the render time is way too high,
(above 10 minutes for the still above) so we now need to look
at different ways to improve the final image and render
time. One way is : - let's not rely on the final gather
rays to correct the blotchiness within the final image, but
instead, let's mess around with the Min and Max radius, I've
set them to Max = 8, and Min = 0.8, and this is the result
that produces : -

This still rendered in
roughly only 2 minutes, and is a vast improvement over the
previous one's blotchines, now experimenting again, I set the
Max value to 16 and increase the FG Rays to 2000 : -
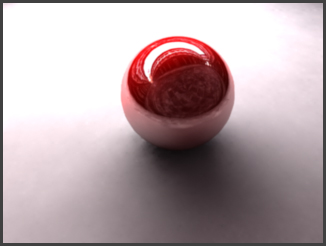
As you can see it's
improving, this one took just under 3 minutes to render,
whereas it's not an exact science, and values can't be given
as defaults for each and every scene, and most of the time the
rules seem to be broken for each and every scene, as in the
case of Min And Max values formula we came up with within the
FG Tutorial, which does not seem to be the case in this scene,
all I can end on is saying, experiment and experiment until
you get the 'look' your after, I just hope that within this
tutorial, you've been able to gain a little insight into
working with HDR Images.
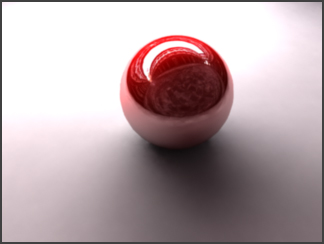
Final Test Render -
FG Rays set to 3500, Max Radius set at 24, Min Radius set
2.4, 4 Minutes 45 Seconds rendered
LAST MINUTE ADDITION -
VERY IMPORTANT
Ok, based on my previous FG
Tutorial, there was a way of calculating the FG Min and Max
samples using the scene size in Units and then taking 10% if
that. However, that was for a flat scene, now again,
this is probably not the way to do this, but I came up with
another idea, when a scene has more depth, i.e. height and
width, measure them both, as in, I get (using Maya's
measure tools) 20.57 (rounded up) for my width, and for my
height I get 11.57 (rounded up). Now, use the formula
Height * Width, and I get 237.9949, let's say, 240 , for
arguments sake we've rounded it up. Now using the
formula from the first scene, i.e. Max radius is 10 % of the
scene in units, that would make the MAX Radius should be set
at 24, and again the MIN Radius should be set at 10% of that,
and so 2.4 is the value there, now look at the final render
test I did, the final values I came up with before the scene
actually started to looking presentable, wow, that's some
co-incidence! Now, like I said, they may be nothing in
it, but the results seem to speak for themselves.
Remember though in the scene above, which was fairly square,
the formula may change if the depth was the longer value in
the scene.
If your wanting to view and
edit HDR Image maps, I'd also recommend downloading HDRShop,
available from : -
http://www.debevec.org/HDRShop
Thanks for reading and I
hope you find this tutorial useful.
|
|
